How to Add Watermark to Photos in 2023
Putting photos on social media is a great way to show your photography talent to the whole world, but it also as it downsides like people can steal your work and post it as theirs, and most of the time, you can't do anything about it and just feel bad about it. That's when watermark images come to the rescue. When you add watermark to images, it shows the world that the image is yours, and no one can steal it. Even if they do, you can show watermark pictures to the copyright enforcers and fight for your rights.
Part 1. What is a Watermark?
That short intro to watermark photos would not have been enough to clear all doubts, so we will give you a good description of watermark on photos and why it is so important to add watermark to photos.
When you add watermark to picture, it protects that picture from getting stolen or uploaded without your permission. No one can even edit that picture when you add watermark to photo and also increase the worth of this picture as now it is not a nameless ownerless, but it has an owner that will protect its rights.
Now that you know what is watermark on photos and their importance, you must be thinking about how to watermark photos to increase their importance, safety and value. We are sharing with you the five best ways to add watermarks to your photos.
Part 2. Batch Watermark Photos in a Click- The Easiest Way
After knowing what a watermark is and its importance, people's first instinct is to add a watermark to all of their photos to prevent them from getting stolen. Still, they often leave this process halfway as adding a watermark to every image individually can be a pretty hectic, time-consuming and infuriating process. If you want to know how to batch add watermark to pictures in one click, then we have HitPaw Video Converter for you.
HitPaw Video Converter has some fantastic image converter and editing features including:
- Convert HEIC, RAW, CR2 and other images to JPG, PNG, WEBP, TIFF, etc. without losing quality.
- Batch image process: Batch convert up to 1000 Photos in 3 minutes.
- Batch watermark, crop, rotate, mirror and adjust image brightness, contrast, etc.
- Smartly compress photos up to 80% without making any visible changes to quality.
How to Btach Adding Watermark to Photos with HitPaw Video Converter
Now, after hearing all these features, you must be excited about knowing how to put watermark on pictures with this excellent software. It is almost effortless; all you have to do is as follows:
-
Step 1.Launch the software after installing to a PC or Mac computer. Go to the Toolbox tab, and select Image Editor feature.

-
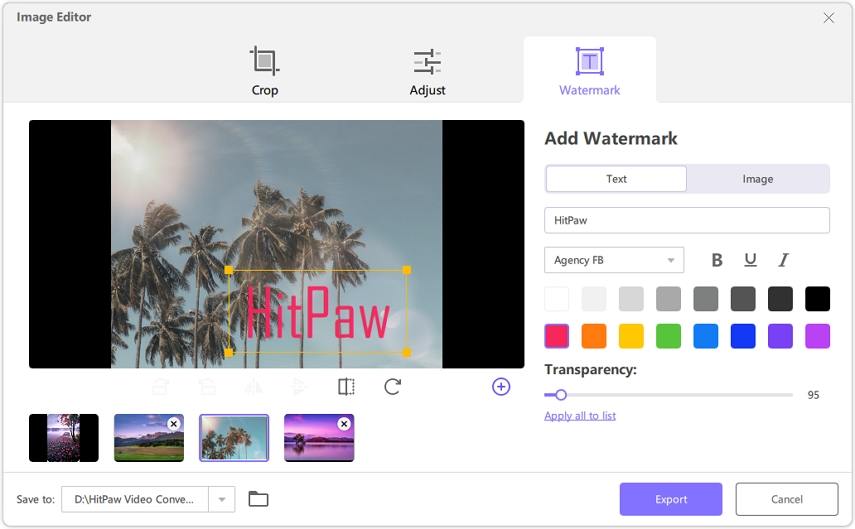
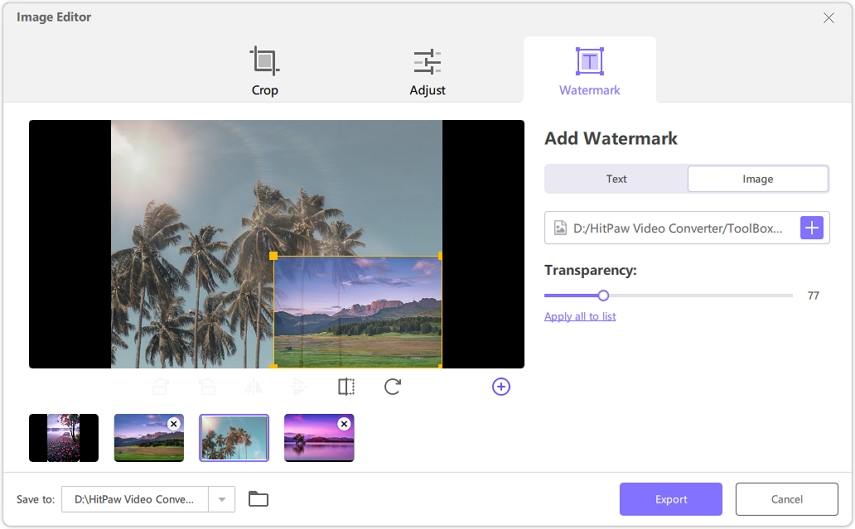
Step 2.Import all your images, and you will see three options on the top panel menu. Crop, Adjust and Watermark. Select Watermark from that. You can add both text or image watermarks.

-
3.To batch add the watermarks to all photos, just tick the option “Apply all to list”.

Part 3. How to Add Watermark to Photos - Alternative Ways
HitPaw video converter’s “Image Editor” feature offers an easy and efficient way to watermark photos in bulk. Here are some other alternate ways to help you if you want to know how to watermark photos for free or with applications and websites other than HitPaw Video Converter.
Way 1. How to Add Watermark to Photos in Photoshop
Now here comes the software that needs no introduction and is the OTL of many videos and photo editors the GOAT - Adobe Photoshop
This below guide will teach you how to put a watermark on a photo using Adobe Photoshop.
- Open your image in Photoshop
- Go to windows, click on Library, and search for your watermark layer.
- Add the watermark layer to your photo.
- Adjust the size and position of the watermark and click save.

Way 2. How to Add a Watermark to a Photo on Mac
Our guide is perfect for you if you want to know how to add a text watermark to a photo on Mac. All you have to do is,
- Open your image with the Preview option.
- From the top menu, click on View and then click on Show Markup Toolbar from the resulting menu.
- Add watermark text to your photo by clicking on the T icon and then typing the text.
- Change the formatting of the text by clicking on the A icon.
- Adjust the position of the watermark.
- Click on File and then click Save to the image with the watermark.

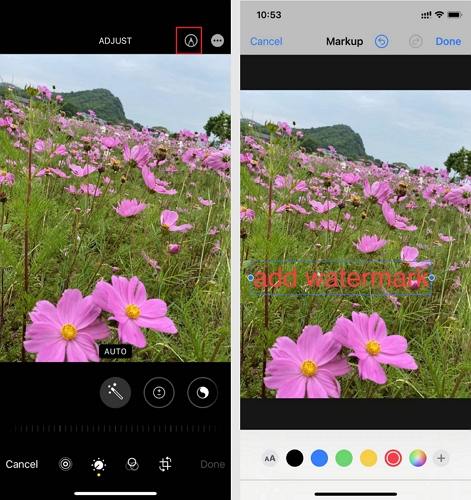
Way 3. How to Add Watermark to Photos on iPhone
If you want to know how to add watermark to your photos on your iPhone, then we have a straightforward guide for you.
- Open the photo on which you want to add a watermark and then click Edit.
- Click the three dots on the upper right corner of the screen and select the Markup option from the resulting menu.
- Select the pen option to draw your watermark image or the + icon to type your watermark text.
- The text option opens up another menu from which you can select font style and colour.
- Drag your text or image watermark to your image and tap Done.
- Tap the upload icon to save the image with a watermark to your camera roll.
Way 4. How to Add Watermark to Photos Online
The list would have been incomplete without adding a free watermark app, and that's why the last mention in our list is a free website that allows you to add a watermark to your image anytime, anywhere. You don't need any software or apps. You only need good internet to add a watermark to your pictures for free.
watermarkly.com is a great online website that allows you to add a logo or text-based watermark to your images. It has an excellent interface which makes it easy to use, and even though it is primarily a free website, it still has some great functions. You can upload the image from multiple platforms like you can add a photo directly from your computer or Google Photos or Drive and even from Dropbox. You can add multiple images etc., and can add both text and logo watermarks.
All these options come with a free plan, which is commendable. Adding a watermark to your image with watermarkly is very simple. All you have to do is,
-
1.Open the website and go to the watermark for free option.
-
2.Drop your images directly or click on the Select Images option.

-
3.Now upload photos from your device, Google Drive, Google Photos or Dropbox.
-
4.Add multiple images with Add Image option or click on Next Step.

-
5.To add a Text Logo, click on Add Text, select your font colour, size, family and opacity from the resulting menu, and add watermark text in the textbox.
-
6.To add a Logo watermark, upload the logo from your device, Google Drive, Google Photos or Dropbox.

-
7.Click on Next Step and save the watermark images to your device, Google Photos or Dropbox.
The Bottom Line
Now, we’ve known what is a watermark on a picture and how it helps keep images safe and secure, increases the value of the image and helps with brand awareness. You should not treat adding watermarks to your images as a choice; it is way more important than this. Our five easy ways to add watermarks to your images must have given you a lot of watermark ideas for photography. If you have a lot photos waiting for adding watermarks, then HitPaw Video Converter is the top recommended for its batch watermark feature and user-friendly interface.







Home > Photo Tips > How to Add Watermark to Photos in 2023
Select the product rating:
Joshua Hill
Editor-in-Chief
I have been working as a freelancer for more than five years. It always impresses me when I find new things and the latest knowledge. I think life is boundless but I know no bounds.
View all ArticlesLeave a Comment
Create your review for HitPaw articles