Detailed Guide on How to Face Retouch Photoshop 2023
Making your photo's skin smooth is paramount; regardless of which camera you use to click the image, it must look clean and clear. Removing the blemishes and retouching the skin is important to make the images look relevant and flawless. You can look at the various tools to retouch images, but photo retouching in Photoshop has more benefits than the rest.
This post introduces the exciting ways to retouch Photoshop on images.
Part 1: Several Ways to Enable You to Photo Retouching in Photoshop
Photo retouching in Photoshop is absolutely simple, regardless of how ugly your photos look. Dive into this exciting part to remove the blemishes in Photoshop and smooth your skin.
1. Removing Blemishes in Photoshop
We'll start by removing the temporary blemishes to adjust the images. These include scratches, discolorations, and acne. Sometimes, the moles, scars, and freckles make the beauty of a particular person look unique and eye-catching.
Here's a photo of a stunning model we took a while ago.
Zoom out her face to start the proceedings. After creating a copy of that image in Photoshop's new layer, we named it ''Blemish Removal''. You must ensure you opt for a new layer when modifying each image aspect. Doing so helps you to march into the previous step effortlessly.
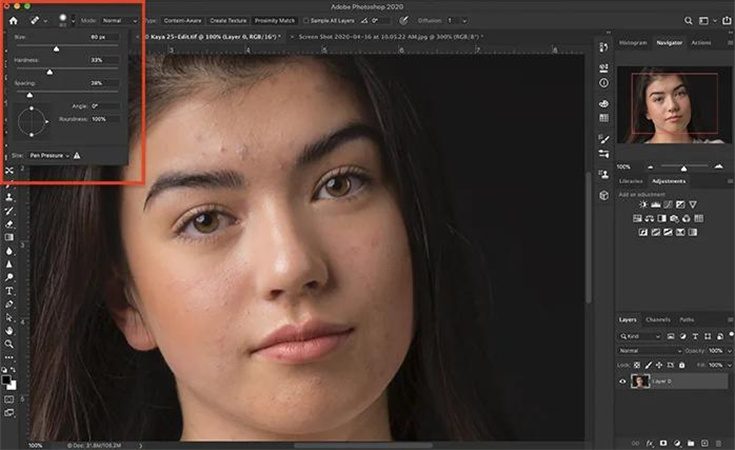
If this is the first time you have produced the duplicate layer, navigate to the Layers icon and select the Duplicate Layer. While photo retouching in Photoshop, the first thing we will do here is to take the Spot Healing Brush Tool on board. The toolbar's icon seems like a bandaid having a bump on it.
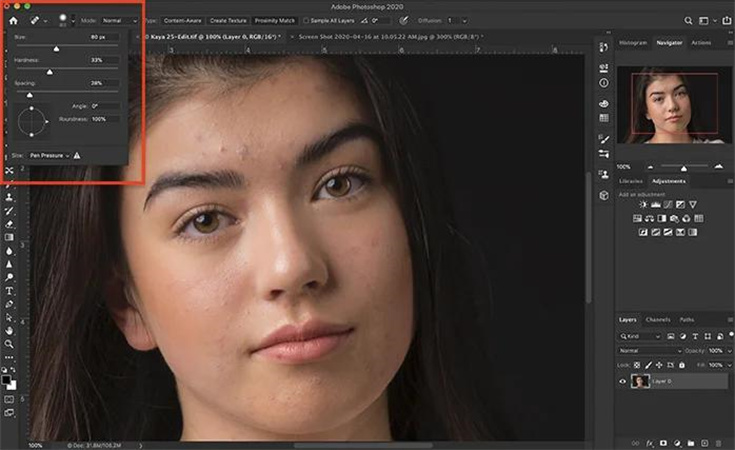
We aim to rely upon the soft brush set to the content file mode. Sizing the brush larger than the blemish you will remove is most recommended. We can use the bracket keys to resize the brush easily. Tap on the blemish, and then it will disappear quickly
Photoshop depends upon the information from the spot's surrounding area to vanish the blemish. You can click on the blemish repeatedly, provided it doesn't disappear quickly. The Healing Brush Tool is most recommended, provided Spot Healing Brush doesn't have the most reliable options.
2. Smooth Skin with Photoshop
There are three brilliant ways to make the photo's skin smooth on Adobe Photoshop. Let's talk about them.
1) Blur ToolOpting for the Blur Tool is probably the simplest and most efficient way to smooth skin in Adobe Photoshop.
Here's how to retouch Photoshop by smoothing skin in Adobe Photoshop.
- 1.First, you must choose the Blemish Removal before copying it to the new layer. Select the Duplicate Layer icon after hitting the Layer option.
- 2.Set the percentage to 100% after choosing the Blur tool. Next, you'll need to paint the blurred area.
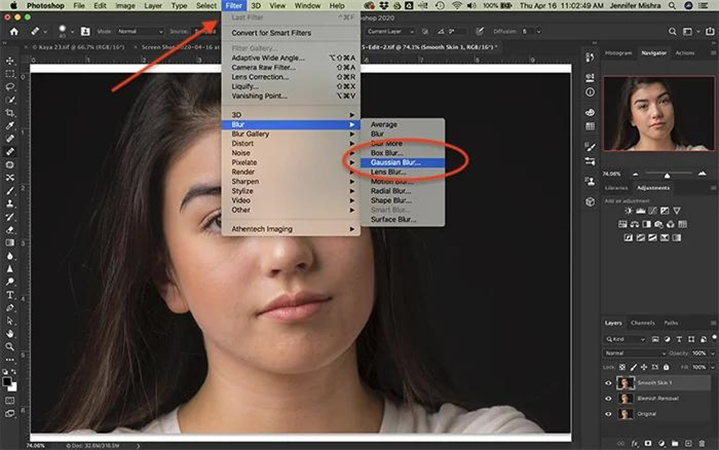
Using the Filter blur rather than opting for the Blue tool enables you to add more control over your softening effect. Using surface blur or Gussian blue as your smoothing effect is also possible.
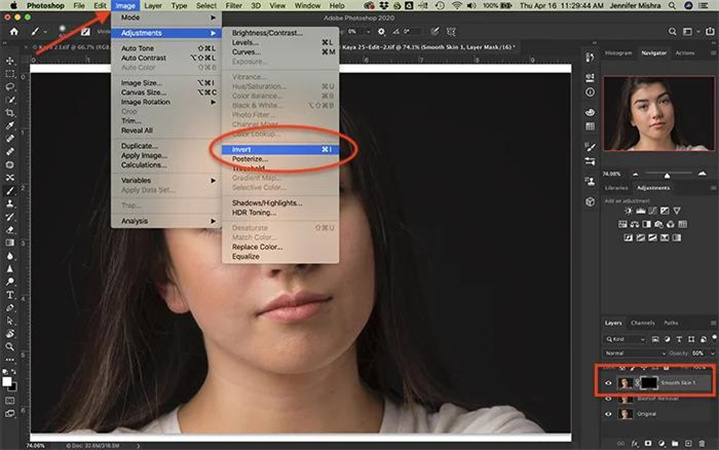
- 1.Choose the ''Blemish Removal'' before copying it to the new layer. Click on the Duplicate Layer icon after hitting the Layer option. You need to label the new layer called ''Smooth Skin 2''.
2.Navigate to the Filter drop-down menu and select the Blur icon. Proceed ahead by selecting the Gaussian Blur icon.

3.Now, you'll need to apply the blue to the skin. You'll need to select the Invert icon after hitting the Image and Adjustments options.

You can look at the High Pass Filter to ensure complete control while Photoshop portrait retouching.
Here's how to do it.
- 1.Copy it into the brand new layer after selecting the Blemish Removal layer. Reduce the opacity to about 50% after selecting the Layer and Duplicate Layer icons.
2.Now, we will apply the High pass filter to the image. Click on the High Pass icon after tapping the Filter and Other icons. Proceed ahead by applying a radius of between 25 and 20 pixels
3.To add the blur, you'll need to click on the Blur icon after hitting the Filter tab. Select the Gaussian Blue before adjusting the pixels from 5 to 10.

Part 2: [Better Way] Your Easy AI Tool to One-click Retouch the Face and Skin
Photo retouching in Photoshop could take a lot of time, courtesy of the hectic user interface of Photoshop. Thus, looking at the HitPaw Photo Enhancer is the best way to enhance the quality of the images, making them look worth talking about. It blesses you with 6 outstanding AI models to make the photos look flawless.
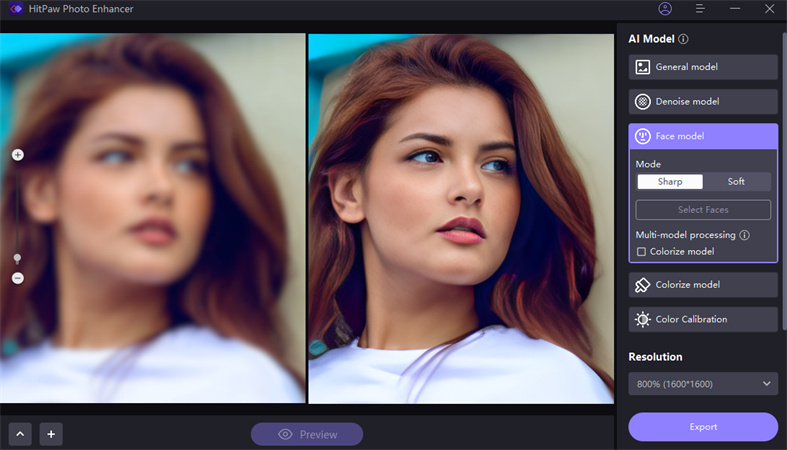
- Supports the Mac and Windows
- It allows you to enhance the quality of the image in a few clicks
- It doesn't affect the resolution of the photos
- Supports Mac and Windows
- Comes up with the 5 brilliant AI models
Here's the step by step guide to retouching the face and skin via HitPaw Photo Enhancer.
Step 1:Start the program and click the Choose File icon to import the photo you want to upscale.

Step 2:HitPaw Photo Enhancer offers five remarkable AI models to improve the quality of images. You can select any desired AI, and selecting the favorite resolution of images is also possible from there.

Step 3:Click on the Preview button and hit the Export button to initiate downloading the photo.
Conclusion
That's it we've had from this post where we have mentioned the brilliant ways to opt for photo restoration in Photoshop. Since Photoshop requires prior knowledge before using it, HitPaw Photo Enhancer is the better option. It enables you to retouch the face and skin in one click.






Home > AI Photo > Detailed Guide on How to Face Retouch Photoshop 2023
Select the product rating:
Joshua Hill
Editor-in-Chief
I have been working as a freelancer for more than five years. It always impresses me when I find new things and the latest knowledge. I think life is boundless but I know no bounds.
View all ArticlesLeave a Comment
Create your review for HitPaw articles