What Is Zoom Watermark? How to Add or Remove It
Applications such as Slack and MS Teams witnessed a sudden growth in their usage. Above all of these applications, Zoom was used the most. The easy of use and the convenience provided by the platform catered the needs of users from almost all industries. However, one thing annoyed the most to almost all the users while using this platform—Zoom watermark. If you are to know how to remove this watermark during your meetings or from your Zoom recordings, then your quest ends here. Read below to know more.
Part 1. What Is Zoom Watermark?
Video watermarks: embeds a watermark of the user who is recording the meeting across the screen. and video. For instance, the user John Doe, with email [email protected], would have "jodoe" watermarked on any recordings he made of any zoom meeting with watermarks enabled. This kind of watermark is commonly used to prevent another party from taking credit for its content and avoid unauthorized video sharing.
Audio Watermarks: The Audio Watermark, or Audio Signature, feature embeds a user’s personal information into the audio as an inaudible watermark if they record during a meeting. If the audio file is shared without permission, Zoom can help identify which participant recorded the meeting.
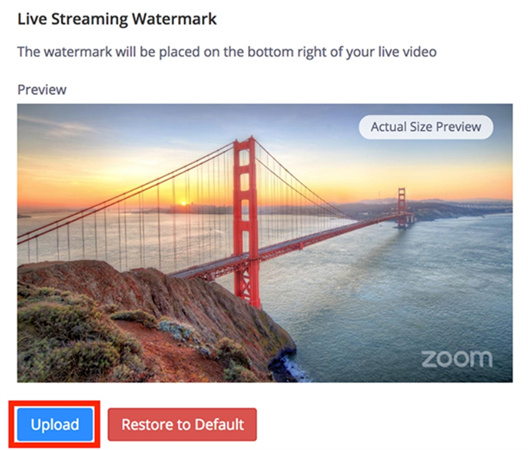
Live streaming watermark: A logo or custom image can be uploaded to your Zoom account to display when live streaming to Facebook, YouTube, Workplace by Facebook, or a custom streaming service.
Part 2. How to Add or Remove Video Watermark in Zoom?
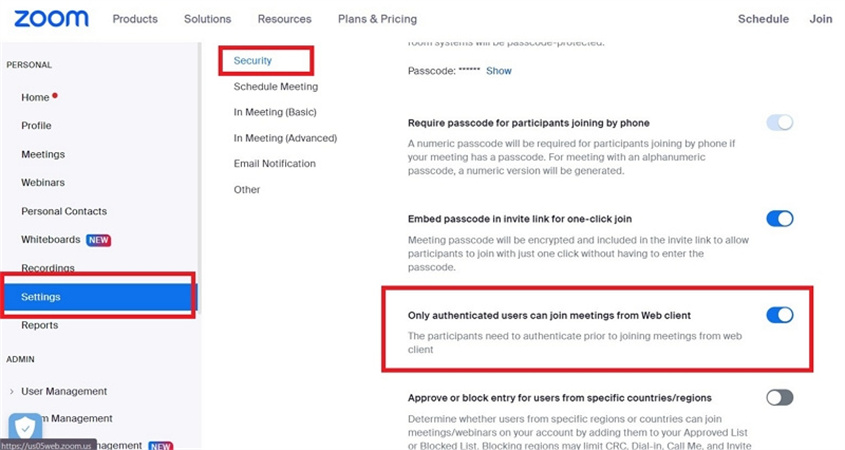
To use the Watermark feature, you must first enable “Only Authenticated Users can join” at your account level (in Settings under “Security”) or “Require authentication to join” at the individual meeting level when scheduling a meeting.
1. Turn on “Only Authenticated Users can join” at account level
1. Begin by signing on to your Zoom web account.
2. Navigate to Settings and click Security tab. Make sure to enable the Only authenticated users can join meetings option.

2. Enable “Require authentication to join” at meeting level
1. Next, go to Meetings tab and select the Schedule a Meeting option to schedule your meeting.

2. Here, go to the Security tab and check off the Require authentication to join option.

3. Add or remove Watermark setting from meetings
1. Next, go to Meetings tab and select the Schedule a Meeting option to schedule your meeting.
2. Scroll down to "Meeting Options" and check/uncheck the box “Add watermark that identifies the viewing participant.”

Part 3. How to Add a Live Streaming Watermark in Zoom?
You can also add a live Zoom watermark. However, you need a paid subscription to the platform to use this feature. If you do have a paid subscription, follow the below steps to know how to live streaming watermark on Zoom.
1. Begin by signing on to your Zoom web account.
2. Now, go to Advanced >> Branding >> Meetings and Webinars >> Live Streaming Watermark section.
3. Tap the Change option to add your brand watermark.

JPG/JPEG or 24-bit PNG
Compatible with 720p video
Maximum resolution: 400x400 pixels4. Once done, you are all set. You can click the Actual Size Preview option to see the sample or tap the Change button to upload a new watermark.

Part 4. How to Remove Any Watermark from Zoom Recording without Blur
We just had a look at how to add or do Zoom remove watermark from meetings. But, what if you wish to remove the watermark from the recorded meetings. At such time a watermark removal tool is needed that can effectively remove the watermark from Zoom recording. HitPaw Watermark Remover is one such tool that comes embedded with AI auto detection technique. This tool can easily remove watermark from Zoom recording.
- Remove watermark from Zoom recording without blur
- Get rid of watermark from videos and images in minutes
- Intuitive AI algorithm to remove the watermarks automatically
- Preview the effect on the video in real time
- Don't need any editing skills to remove the watermarks
Follow the below steps to know how to remove Zoom watermark using this tool.
Step 1: Download, install, and launch HitPaw Watermark Remover on your PC. Tap on the window at the center to add zoom recoding video file you wish to get rid of watermark or logo or text from.

Step 2: Select from five different modes to get rid of watermark as per your needs.

Step 3: Next, select the watermark and move in the timeline to select the duration of this watermark.
Step 4: Lastly, click the Export option to remove watermark and save it. Click Open folder to see your zoom recording without watermark.

Conclusion
Having said that, we just had a look at different types of Zoom watermark. We also had a look at different techniques that can be used to add or remove these watermark from Zoom meetings. You can also add a live streaming watermark in Zoom, provided they have a paid subscriptions. Lastly, you can easily remove watermark from Zoom recordings with the help of HitPaw Watermark Remover. The tool that comes embedded with AI auto detection technique that effectively removes watermark from Zoom recording.


Home > Watermark Tip > What Is Zoom Watermark? How to Add or Remove It
Select the product rating:
Joshua Hill
Editor-in-Chief
I have been working as a freelancer for more than five years. It always impresses me when I find new things and the latest knowledge. I think life is boundless but I know no bounds.
View all ArticlesLeave a Comment
Create your review for HitPaw articles