How to Burn ISO to DVD- Step by Step Guide
Have you ever encountered an ISO file and wondered how to make it into a bootable DVD? Let us demystify the process for you. Whether you're looking to install or reinstall an operating system like Windows or create a backup of important software applications, burning an ISO to DVD is the way to go.
But first, let's clarify what an ISO file is. It's a CD/DVD-ROM image file containing the entire CD-ROM contents. Think of it as a digital clone of the original disc. Like old boot floppy diskettes, CD or DVD-ROM discs can boot to a DOS or other operating systems.
This blog post guides you through burning an ISO to DVD. We'll cover the necessary software, settings, and techniques to make the process seamless and hassle-free.
By the end of this guide, you'll be able to create bootable DVDs from ISO files like a pro. So, grab your blank DVDs, and let's dive in because burning ISO to DVD has never been easier!
Part 1. How to Burn ISO to DVD on Windows 11/10/8/7
If you're looking to burn an ISO file to a blank DVD on Windows 11, Windows 10, Windows 8, or Windows 7, you're in luck. Windows provides a built-in tool called Windows Disc Image Burner to help you accomplish this task without needing third-party software.
Please note that this method applies to Windows 11, Windows 10, Windows 8, and Windows 7. If you're using an older version of Windows like Windows XP or Windows Vista, it's recommended to download a third-party ISO to DVD burner.
Here's a step-by-step guide on how to burn an ISO to DVD using Windows Disc Image Burner:
- Insert a blank DVD into your computer's disc burner drive.
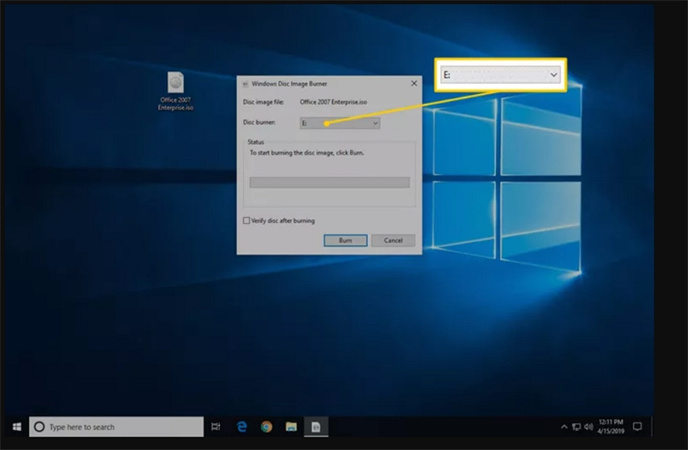
Right-click on the ISO file you want to burn and select "Burn disc image" to open the Windows Disc Image Burner window. If you're using Windows 7, you can double-click the ISO file.
Note: In case you encounter the "missing Windows Disc Image burner for ISO files" issue, right-click on the ISO file, select "Open With," choose "Choose another app," scroll down to select "Look for another app on this PC," navigate to C:\Windows\System32, select "isoburn.exe," and click Open.
From the drop-down menu of "Disc burner", select your disk burner drive.

- Click on "Burn" to start the burning process. A progress bar will indicate the overall burning progress, which can take a few seconds to several minutes, depending on the size of the ISO file and the speed of your disc burner.
- Once the burning process completes, the disc will eject from the disc drive, and the "Status" description will indicate that the disc image has been successfully burned.
Now you can eject your freshly burned DVD and enjoy the contents of the ISO file on your DVD player or computer.
Part 2. Burn ISO to DVD on Windows with Free ISO Burner
If you're looking for a simple and reliable solution to burn ISO files to DVD on your Windows system, Free ISO Burner is the tool for you. This lightweight software supports both 32-bit and 64-bit versions of Windows 10, 8, 7, Vista, and XP. The best part? It's completely free to use and comes without any adware or spyware.
Let's dive into the step-by-step guide on how to use Free ISO Burner:
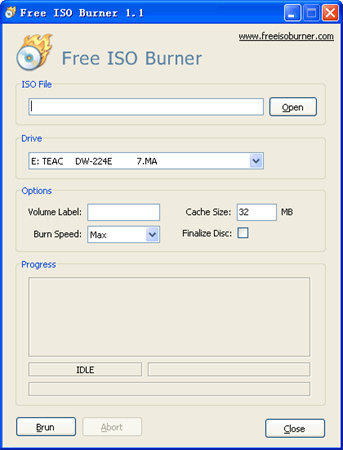
- Download Free ISO Burner. Don't worry; it will take up little space on your computer. The latest version, 1.22, is only 673.5 KB in size. Plus, there's no need to go through a complex installation process. Simply double-click on the FreeISOBurner file you just downloaded to open the program.
- Insert a blank DVD into your DVD drive. Make sure you have a writable DVD ready for the burning process.
Launch Free ISO Burner and click the "Open" button. This will allow you to locate and select the ISO file you want to burn to a DVD. Browse your computer and choose the desired ISO file.

- Check the selected drive under "Drive" to ensure it matches the DVD drive where you inserted the blank disc. Verify that you have selected the correct DVD for burning the ISO file.
- You can explore the customization options under "Options." However, leaving them as default settings is best if you need clarification.
- Now, click the "Burn" button at the bottom left corner of the interface to start the burning process. Free ISO Burner will display the progress for you, keeping you informed. Once the burning is complete, the DVD will automatically eject from the drive.
Part 3. How to Burn ISO to DVD on Mac
1.Burn DVD from ISO with Mac Finder
Finder, the default application for Mac users, can also be used as ISO-burning software. Follow these steps to burn an ISO to DVD using Finder on your Mac:
- Open Finder and navigate to your ISO image file.
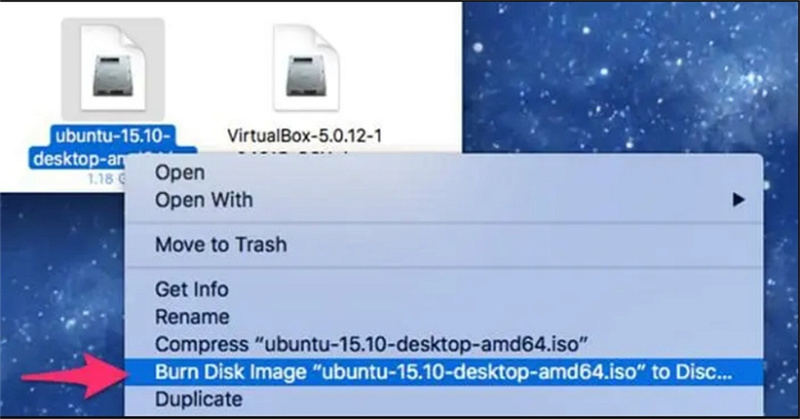
From the File drop-down list, select "Burn Disk Image ** to Disc." You can also access the same option by right-clicking on the ISO file.

- Insert a blank DVD into your Mac's optical drive.
- Click "Burn" to initiate the creation of a bootable DVD from the ISO file using Finder.
- Wait for the ISO to DVD burning process to complete. You will receive a notification when it finishes.
2.Burn ISO to DVD with Disk Utility
Disk Utility, a built-in Mac app, offers another method to burn ISO to DVD. Here's how:
- Insert a blank DVD into your Mac's disc slot. Connect an external DVD drive if your Mac doesn't have a built-in disc slot.
- Open Spotlight by clicking the magnifying glass icon in the top-right corner of your Mac's desktop.
- Type "disk utility" into Spotlight to search for the Disk Utility app. Click on it in the search results to open it.
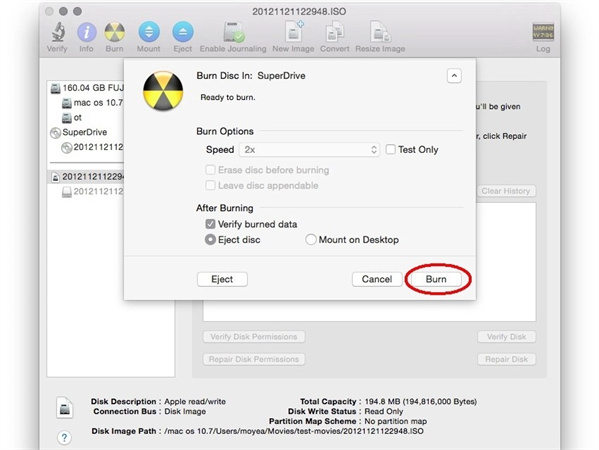
- In Disk Utility, click the "Burn" button at the top of the window. A Finder pop-up window will appear, prompting you to select the ISO file you want to burn. Choose the ISO file and click the blue "Burn" button in the window's bottom-right corner.
- You will see a small Disk Utility window with several options. Click the "Burn" button.
When prompted, click "OK." This will conclude the burn process, and you will see a completion message in the window's lower-right corner.

Following these steps, you can easily burn ISO to DVD using Finder or Disk Utility on your Mac. Enjoy creating bootable DVDs and preserving your data in a physical format!
Part 4. Pro-tip: High-Quality ISO Ripper and Burner on Windows and Mac
Looking for a reliable ISO ripper and burner for Windows and Mac? We proudly present HitPaw Video Converter, the ultimate software that combines the power of a DVD converter and a DVD burner. With HitPaw Video Converter, you can effortlessly rip ISO files into videos or convert your videos into playable ISO files.
Highlighted Features
- Burn DVD disc, folder and ISO files from any videos including MP4, MOV, AVI, TS, etc.
- Provide built-in templates and support customize menu when creating DVD
- GPU accelerated speed without quality loss
- Convert DVD disc, blu ray disc, DVD folder and ISO files to any video or audio format
- Compatible with both Windows and Mac
How to Burn Videos to a Playable ISO File on Windows and Mac?
Explore the two incredible features and discover how to burn your videos to an ISO file.
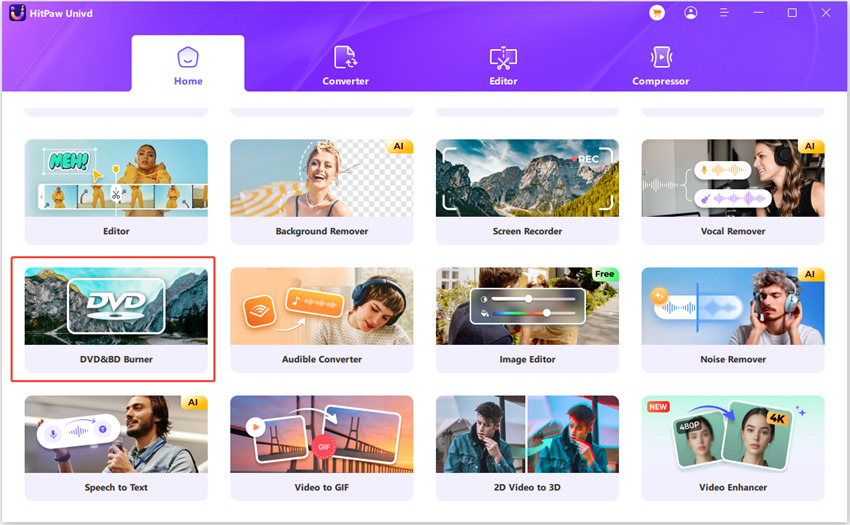
Step 1: Launch HitPaw Video Converter and navigate to the Toolbox section. Select the DVD Burner feature to unleash its magic.

Step 2: Now, it's time to add your videos to the HitPaw DVD Burner interface. Simply click the "Add Files" button or drag and drop your desired videos easily.

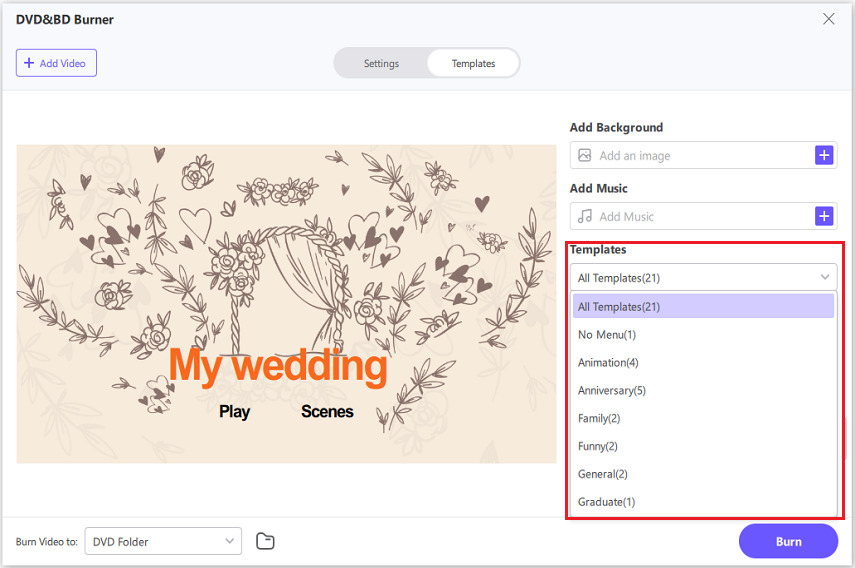
Step 3: Switch to the Templates tab and explore the captivating DVD templates available. Select your preferred DVD template from the dropdown menu and get creative. Customize the DVD background, add background music, and give your DVD a unique title. With HitPaw Video Converter, your DVD will be a true masterpiece.

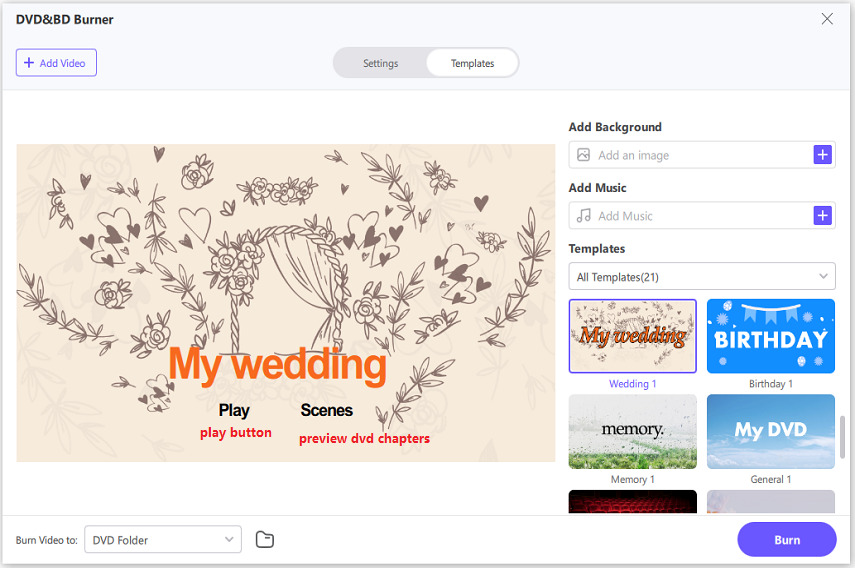
Step 4: Take a moment to preview your DVD slideshow. Click the play button to immerse yourself in the magic, or navigate the chapters using the Scenes feature. This way, you can ensure your DVD is perfect before proceeding.

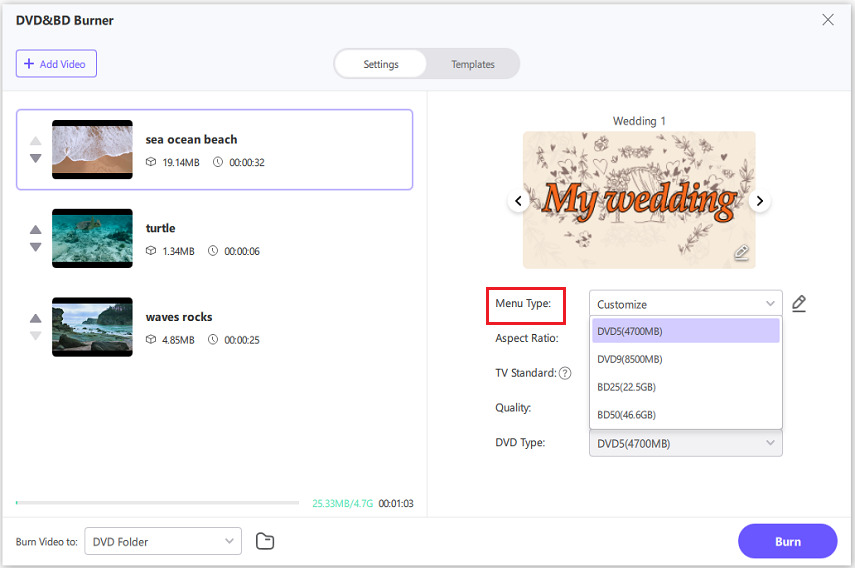
Step 5: On the Settings panel, you have the power to customize your DVD. Set a DVD label (remember to insert a blank disc), choose a stunning DVD menu, and select your preferred aspect ratio. Select the suitable TV standard (NTSC or PAL), DVD quality, and DVD type (DVD-5 or DVD-9) according to your preferences.

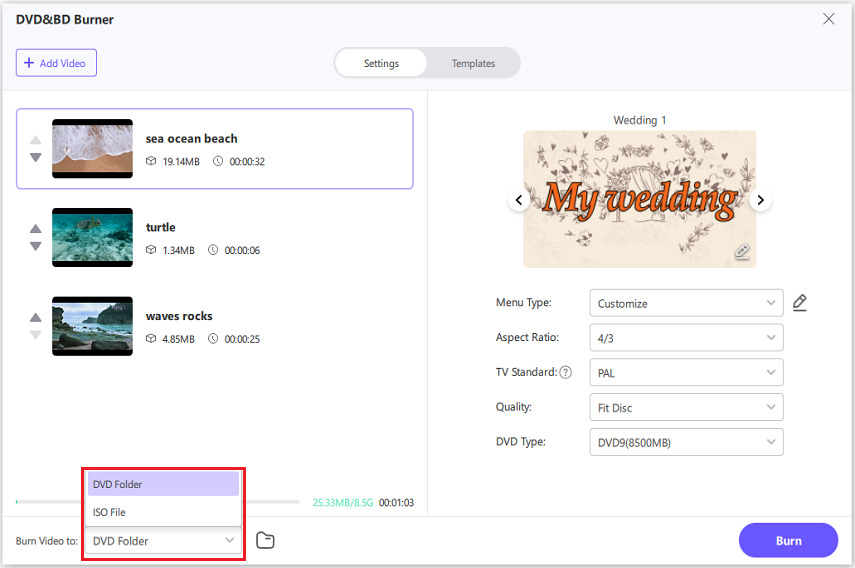
Step 6: Finally, select the output file type - DVD, DVD folder, or ISO file. Choose the one that suits your needs and preferences

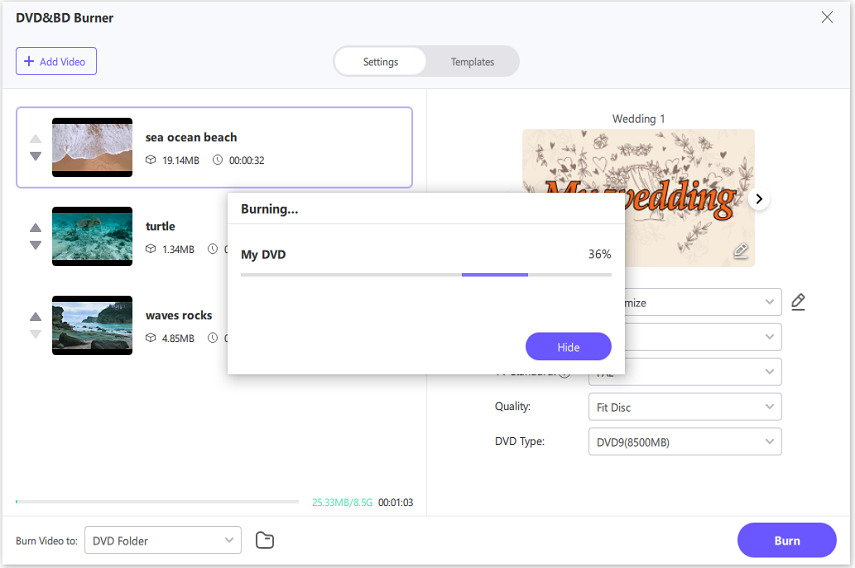
Step 7: Simply click the Burn button, and HitPaw Video Converter will work its magic, swiftly burning your videos to DVD with exceptional speed.

With HitPaw Video Converter, the world of DVD creation is at your fingertips. Experience this remarkable software's convenience, quality, and creative possibilities. Unleash your inner filmmaker and create DVDs that leave a lasting impression.
Part 5. The Bottom Line
We have explored the fascinating world of ISO files and their applications. We have covered everything from understanding what ISO files are to learning how to burn them to video or create ISO files from videos.
But before we part ways, we recommend a tool that will make your ISO file conversions a breeze - HitPaw Video Converter. With its user-friendly interface and powerful features, HitPaw Video Converter allows you to effortlessly convert and manipulate ISO files with just a few clicks.
So, why not try it and unlock a new world of video conversion possibilities? It's like having a magic wand, ready to turn ISO files into captivating videos or create ISO files from your favorite videos.







Home > Burn DVD > How to Burn ISO to DVD- Step by Step Guide
Select the product rating:
Joshua Hill
Editor-in-Chief
I have been working as a freelancer for more than five years. It always impresses me when I find new things and the latest knowledge. I think life is boundless but I know no bounds.
View all ArticlesLeave a Comment
Create your review for HitPaw articles