4 Easy Ways to Remove Watermark in GIMP
GIMP is majorly popular among people who are expert in editing images. This tool is used to enhance the pics and provides some useful features as well. But do you know how to remove watermark GIMP? Well, similar to Photoshop, there are many tools that can be used within GIMP to remove watermark. And today, we will talk about some of those methods that can be used to get rid of watermark.
Part 1. How to Remove Watermark in GIMP Using Clone Tool
The clone tool is one of the best and easiest tools that can be used for GIMP remove watermark. You can copy a similar portion of the pic by using the CTRL key and paste it to any portion on the image. Follow the below steps to know how to use this tool for watermark removal.
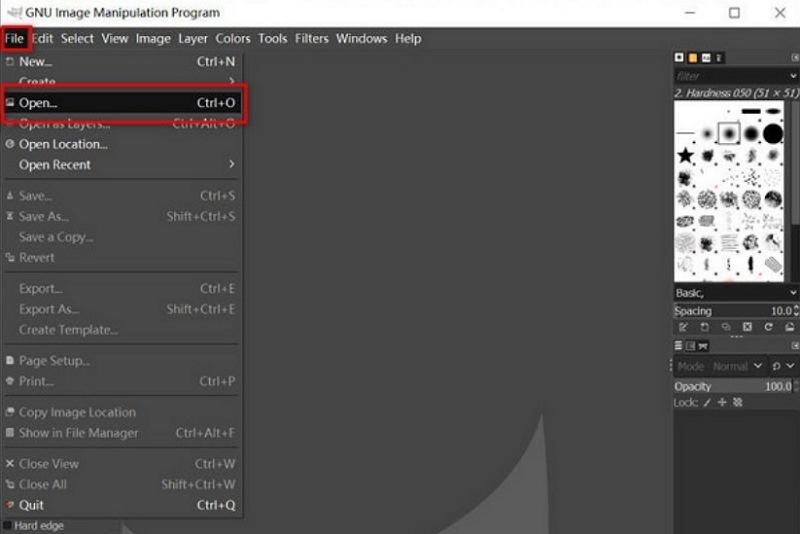
1.Begin by opening the image in GIMP using the CTRL+O key combination or click the File tab and click Open. Select the pic from the device and click Open.

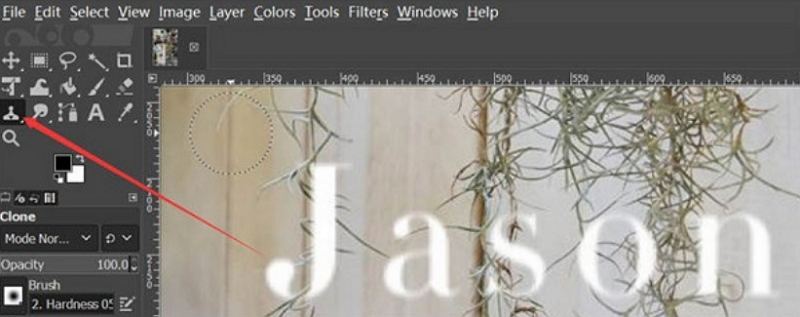
2.Next, use the clone tool from the Tools >> Paint Tools >> Clone menu.

3.Select a clear portion from the image that matches the watermarked area. To choose a region, use the CTRL-key and click on a particular region.
4.Now begin painting over the watermark area. To paint a particular portion, use the CTRL key and start sliding over the portion on image.
5.Repeat the cloning process by selecting the different regions and till you get desired results.
6.You can adjust the settings for his tool from the Tool option menu in the Toolbox menu at the bottom. The brush angle, size, , spacing, mode, and other options can be tweaked from this menu.
Part 2. How to Remove a Watermark GIMP by Cropping
Apart from the Clone tool, users can also use the cropping feature for GIMP watermark removal. However, this method is only suitable if the watermark is present at any of the corners in the image. Follow the below steps to know how to crop watermark from the image.
1.Begin by opening the image in GIMP using the CTRL+O key combination. Select the pic from the device and click Open.
2.Switch to the Crop tool with the Shift + C key combination.
3.Click and drag to define your crop region, adjust the edges to crop the watermark.
4.Hit Enter to once you get desired results.

Part 3. How to Use GIMP Remove Watermark from Images Having Layers
Another method to know how to watermark in GIMP remove is to use the layers. Using this method is quite simple and easy. Follow the below steps to know more.
1.Begin by opening the image in GIMP using the CTRL+O key combination. Select the pic from the device and click Open.
2.Next, click on the watermark layer and Hit the Delete key to get rid of the watermark layer from the image.
3.You can save the image on their device.
Part 4. How to Remove Watermark GIMP using Resynthesizer Plug-in
The resynthesizer plugin offers different tools for editing the images. You can also know how to add a watermark in GIMP. But we are here to remove the watermark. Follow the below steps to know how to use this plugin.
1.To begin with, make sure that the plug in is downloaded in GIMP. Next, users can select the desired tools as per their preference.
2.Using your choice of selection tool, make a selection surrounding the watermark you wish to remove.
3.The Free Select tool or the Scissors Select tool will be ideal for selection.
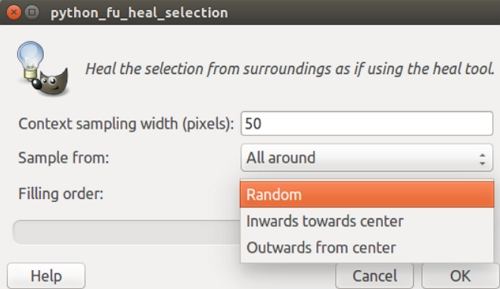
4.Go to the Filters menu and select the Enhance submenu and select Heal selection.

5.Change the settings for the sample locations, how much of the image must be used for sampling, and then select your fill order.

6.You have to adjust with the settings until they get the desired results. Once done, click OK and the plugin will start processing.
Part 5. Best GIMP Alternative to Remove Watermarks from Photos Easier
As seen above, we saw the GIMP watermark remover tools but they do not work efficiently. Also, users need some knowledge of the tool before using it. Hence, it is not suitable for new users to use this tool to remove watermark. Thus, how to remove watermark without GIMP?
HitPaw Watermark Remover is the best alternative to GIMP and can help users to easily remove watermark from photos. It comes with its own AI that easily and automatically detects and removes watermark efficiently. The tool not only removes watermarks but also efficiently remove different elements such as people, text, time, logos, and other unwanted objects. Follow the below steps to know how to use this tool.
Step 1.Download, install, and launch HitPaw Watermark Remover on your PC. Drag and drop the image to import it into the program.

Step 2.Choose the watermark with the help of the most suitable selection tool (such as the Polygonal Lasso Tool or Marquee Tool).

Step 3.Select AI model and tap the Preview option and the tool will begin to remove watermark automatically using AI.

Step 4.Lastly, tap the Export option to save it.

Conclusion
All in all, we just had a look at different methods to know how to remove a watermark GIMP. The best alternative to GIMP is HitPaw Watermark Remover as it comes with its built-in AI that automatically detects watermarks in the images and removes them easily.


Home > Photo Tips > 4 Easy Ways to Remove Watermark in GIMP
Select the product rating:
Joshua Hill
Editor-in-Chief
I have been working as a freelancer for more than five years. It always impresses me when I find new things and the latest knowledge. I think life is boundless but I know no bounds.
View all ArticlesLeave a Comment
Create your review for HitPaw articles