What is the Best Video Stabilization Software?
One of the most important things to keep in mind while filming a video is to keep it as smooth as possible. But it’s almost nearly impossible to keep the hand steady at all times, hence comes the Video Stabilization Software. These software are specially designed to reduce the shakiness of the footage. There are lots of paid and unpaid options available for Mac, Windows, and Linux. Let’s take a closer look at some of them and then you can decide which one is the best for you.
Part 1: Best Free Stabilization Software
All the video editing software offer different features, some are even hard to use. So make sure you have complete knowledge about the one you are going to use. To help you guys out here is a quick review of 5 of the most popular video stabilization software, along with their features and a step by step guide on how to use their stabilization feature.
1. iMovie – Free Stabilization Software Mac
Apple has once again outdone itself with this amazing video editing software. It offers some of the most precise tools that are hard to find in any other budget-friendly and basic software. It not only offers video stabilization but it is packed with plenty of other remarkable tools like Slow Motion, iDVD integration, Green screen abilities, etc. Moreover, this is a free video stabilization software for mac as its already pre-installed in new Mac Computers so you probably don’t have to spend a penny.
How to Use the Stabilization Feature?
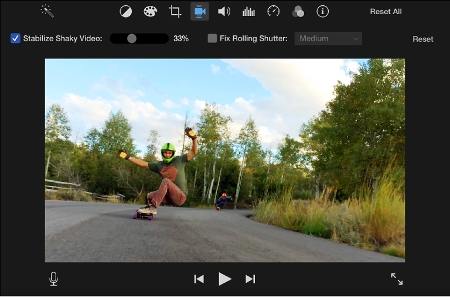
- 1. In the timeline, choose the video you would like to stabilize.
- 2. Click on the Stabilization button located in the adjustment bar.
- 3. Now tap on the Stabilize Shaky Video Checkbox
- 4. Now drag the slider and adjust according to the amount of stabilization you want to apply on the clip.
- 5. Play the video to see the effects of stabilization.

2. Windows Video Maker – Best Free Video Stabilization Software for Windows
This video editing software comes with some extremely useful tools and offers about 50 different transition effects and almost 20 visual effects. From trimming your videos to adding caption, titles, and music you can perform so many tasks using this video editor. And of course, this editor supports the Video Stabilization feature as well to make your videos smooth and error-free. You can download it and use this video stabilization software free.
How to Use the Stabilization Feature?
- I. To select the video click on the "Add Video and Photos" icon.
- II. Now select the portion you need to stabilize by tapping on the shaky video selection option located on the right side.
- III. Click on the ”Edit” button to enable the video stabilization feature.
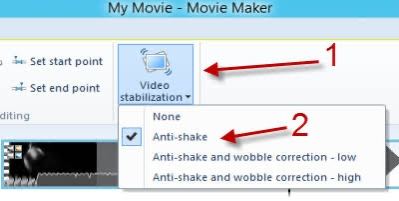
- IV. A Video Stabilization menu will appear containing 3 option, "Anti-shake", "Anti-Shake and Wobble Correction – High", and "Anti-Shake and Wobble Correction – Low". Select the desired one.
- V. Once you click on the suitable option, the Windows Video Maker will automatically fix the shaky portion.
Part 2: Video Stabilization Software Mac (Paid)
For people using Mac, this is the best video stabilization software because according to the experts this is a life-saver when it comes to editing shaky videos. Though the software is a bit pricey, but it contains cool automatic tools like Easy export, Blu-ray support, iChat theater, ProRess Codecs, Full DVD support, and many more. This highly advanced software with video stabilization feature enables both, the new videographers as well as the experienced one’s, to make their footage beautiful and smooth.
How to Use the Stabilization Feature?
- I. Create a project and upload the video you want to stabilize in your timeline
- II. This software stabilizes the entire footage and not range.
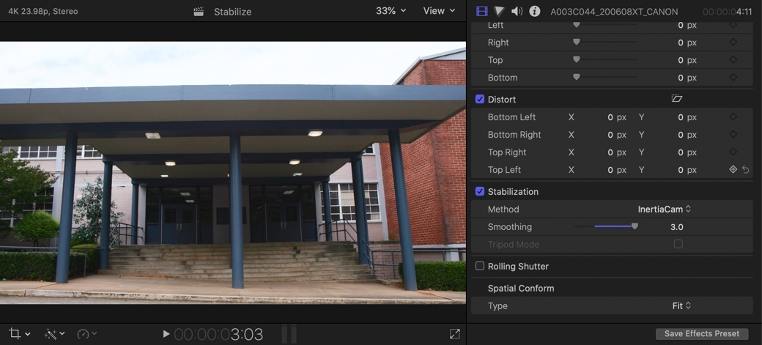
- III. Click on the inspector button and then tap on the "stabilization" button.
- IV. If you have selected the default stabilization method then the software will automatically choose the best method for your video and will give the final results once the stabilization is complete. Play the video and see the results.
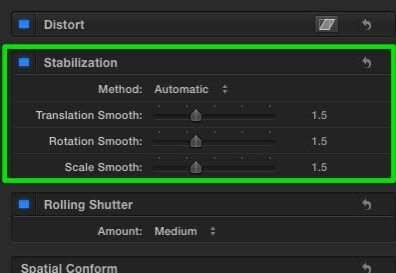
- V. In case you’re not satisfied with the results then you can adjust the stabilization control by clicking on "Show" meet to stabilization.
- VI. Click on "InertiaCam" if your footage has pans, tilts, and zooms.
- VII. Or choose "SmoothCam" if your video doesn’t feature these camera movements. SmoothCam works on X, Y, and Z-axis which means you can individually control translation, rotation, and scale to achieve the best results.

Part 3: Video Stabilization Software Windows (Paid)
There are several reasons which make Adobe one of the most reliable software and one of them is its advanced stabilization feature. It costs around $100 to $150 and offers countless useful tools like face detection, trimming, titles, background sound replacement, color adjustments, slow-motion effects, etc. And not only this but with the help of Shake Reduction yin can also reduce the shakiness of your footage.
How to Use the Stabilization Feature?
- I. Select your video you want to stabilize.
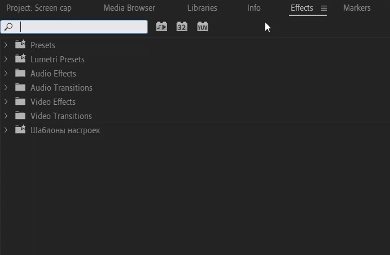
- II. Now click on the "Effects" to fine Wrap Stabilization.
- III. Double click on it to enable the stabilization feature.
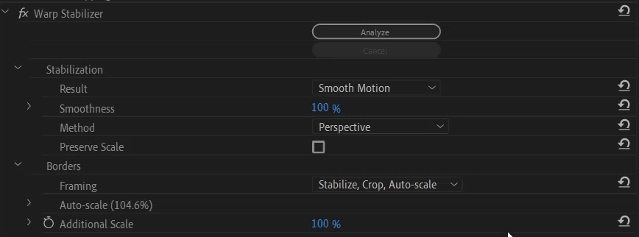
- IV. Now adjust the smoothness parameters as per your requirements. Zero is closest to the actual recording, while the higher numbers reflect a much prominent result.
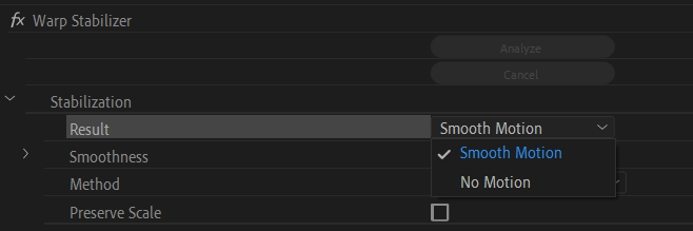
- V. If you want to reduce the shakiness and keep the camera movement then click on "stabilization", then "results", and "Smooth Motion". However, you completely wang to remove the camera movements then select "No Motion".
- VI. Play the video to see the results.
Part 4: Video Stabilization Software Linux
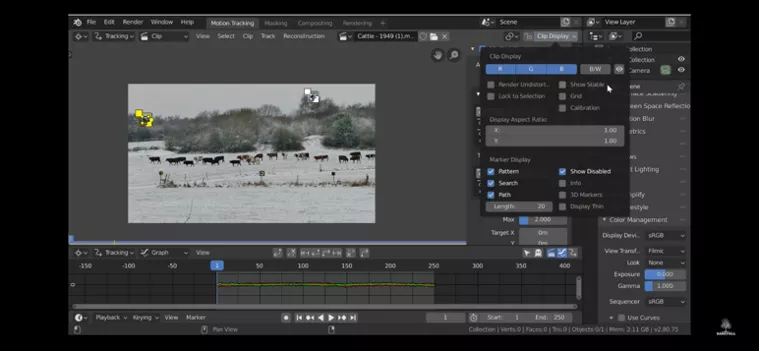
When we talk about Linux then Blender is the most suitable video editor for the users. It allows you to perform not only basic editing function but offers complex tools like color grading and video making. Moreover, you can also control speed, add a filter, transitions, audio mixing, and video stabilization using this software.
How to Use the Stabilization Feature?
- I. Tap on "open" to upload the video clip.
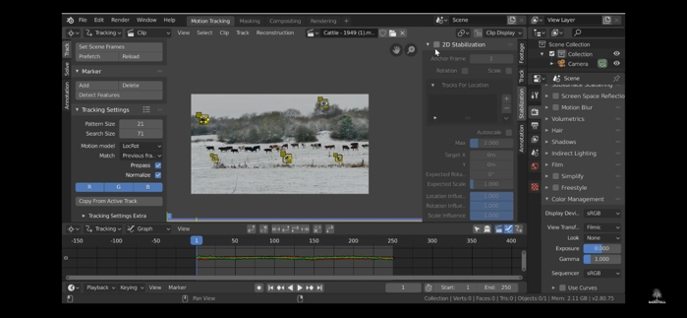
- II. Click on the "set scene frame" located on the left to generate the video timeline.
- III. Click on "Tracking settings" and select locRot. Add as many markers as you want for location and rotation.
- IV. Now click on the "Stabilization" tab to enable 2D stabilization.
- V. Select the tracks for location and rotation you marked earlier.
- VI. Tap on "clip display" located at the top and select "show stable".
- VII. Now click on "Autoscale". Or if you prefer to adjust according to your preference then you can move the slider to get the desired results.
- VIII. Play the video and enjoy the stable version of your footage.
Part 5: Bonus Tip – The Easiest Video Editor You May Like
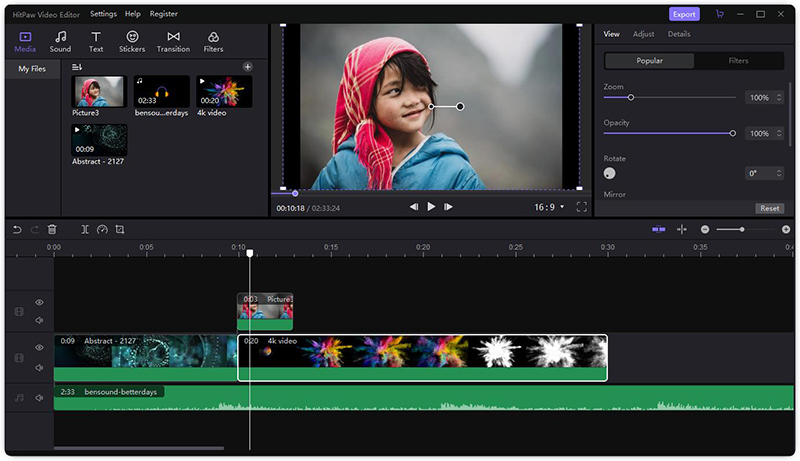
There is a chance that you may find all the above-mentioned software hard-to-operate because of their unique interface. Henceforth, you can use a much simple yet extremely useful editor HitPaw Edimakor. It will not only stabilize your shaky video clips but its powerful tools will enhance your videos even more. Let me tell you all about this amazing software.
Features:
- I. Offers dozens of filters, sound effects, transitions, and fun stickers.
- II. Along with basic editing tools like cropping, rotation, zooming, splitting, etc. you can also change the background music seamlessly.
- III. Allows you to add text, titles, subtitles and watermarks.
- IV. Allows you to import media files from any platform including phones, PCs, camcorders, etc.
- V. Easily changes the speed and opacity of the video.
Advantages:
- I. Has a very easy-to-use and self-explanatory interface.
- II. You can have its premiere version in just $29.95 which is quite cheap as compare to other video editors.
- III. After editing the video you can export it to any social media platform and share your masterpiece with the world.
- IV. Provides you with alomst all of the basic video editing features, fully meeting your different needs of editing.
Conclusion
Video stabilization is quite important when it comes to enhancing the quality of the footage. And if you record a shaky video then you can use either of the above mention software. However, each video stabilization software offers a unique and useful feature, so make sure you select the one that best satisfies your need. Also, it is recommended for new videographers to use the unpaid software first and then invest in paid software. And if you an expert then HitPaw Edimakor is the ideal software for you because you can perform plenty of amazing tools along with stabilization to beautify your work.
People Also Asks
Which software has the best video stabilization?
Every software has its pros and cons and it all depends on the quality you want to achieve. However, if you are a Mac user then it is better to use iMovie as it is free and offers many useful features. Whereas, for a windows user you can invest in Adobe Premiere Pro. But if you don’t want to spend a hefty amount then ApowerEdit is the perfect choice for you.
Can I stabilize the video after recording?
Yes, you can use the stabilization feature in the post-recording process while giving your video final touches. Just remember to preview the edited version first before sharing it with the world.
How do you stabilize a video?
In every software, there is a different stabilization procedure. And for every software, you can either view step by step guide mentioned above or you can also watch YouTube tutorials before staring off your work.

You May Be Interested
Video Creativity Beyond Imagination
Create standout videos with HitPaw's easy-to-use video editor.

Stabilizing blurry footage is extremely important when it comes to video editing but which software is the most reliable one? In this article, we will discuss some of the best video stabilization software, free and paid both, for Mac, Windows, and Linux users.


Join the discussion and share your voice here
Leave a Comment
Create your review for HitPaw articles