Top 3 Ways to Burn Movies to DVD on Windows/Mac
It's no secret that burning movies to DVD can be a great way to create lasting memories with your friends and family. Whether you want to relive your favorite moments on the big screen, back up your treasured films, or just have a fun night in with your loved ones, burning movies to DVD is the way to do it.
This guide will show you how to burn any movie to DVD on Windows and Mac. So, whether you're a Mac or Windows user, here's how you can burn your favorite movies to DVD disc, or DVD folder.
Part 1. Preparing to Burn a Movie to DVD
When it comes to burning a movie to DVD, you'll need a few things. Here are the necessary materials you'll need:
1. A computer with a disc drive
This should be an obvious one, but you'll need a computer with an internal or external disc drive in order to burn a movie to DVD. With an internal disc drive, you can simply insert the DVD into your computer. With an external disc drive, you'll need to connect it to your computer via USB.
2. A blank DVD
Next, you'll need a blank DVD to burn your movie onto. DVDs come in different sizes, so make sure to get the right one for your movie.
3. A DVD burning software
Finally, you'll need DVD burning software. This is the software that will actually burn your movie to the DVD. There are many different types of DVD-burning software, so make sure you choose one that's compatible with your computer.
Part 2. How to Burn Movies to DVD on Windows and Mac -Editor Choice
When it comes to burning movies to DVD on Windows and Mac, the market is full of software. From the free options to the more advanced ones, it can be hard to know which one is best for you.
But if you're looking for the best of the best, look no further than HitPaw Video Converter. It's our top choice for burning movies to DVD on Windows and Mac.
HitPaw Video Converter is an all-in-one DVD converter and creator software that supports converting DVD to digital and burn DVD from videos.
Summary of HitPaw Video Converter Outstanding Features
- Burn videos to DVD disc, folder and ISO image file
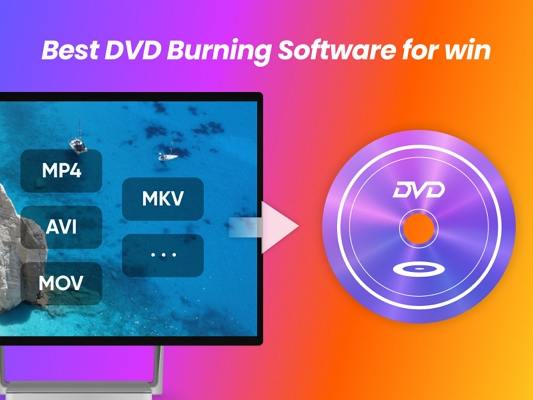
- Supports 300+ video formats, so, no matter what the format of your movies, you can add them directly
- Create video to DVD-9/DVD-5 discs that are playable on various DVD player and computers without region restrictions
- Create DVD to PAL or NTSC
- Free built-in DVD templates
- Supports adding your own background music
- Customize DVD menu, background, title, etc.
- Fast burning speed
- Supports Windows 11/10 and latest macOS.
The Steps to Burn a Movie to DVD with HitPaw Video Converter
Burning a movie to DVD with HitPaw video converter is a breeze; here's how you do it:
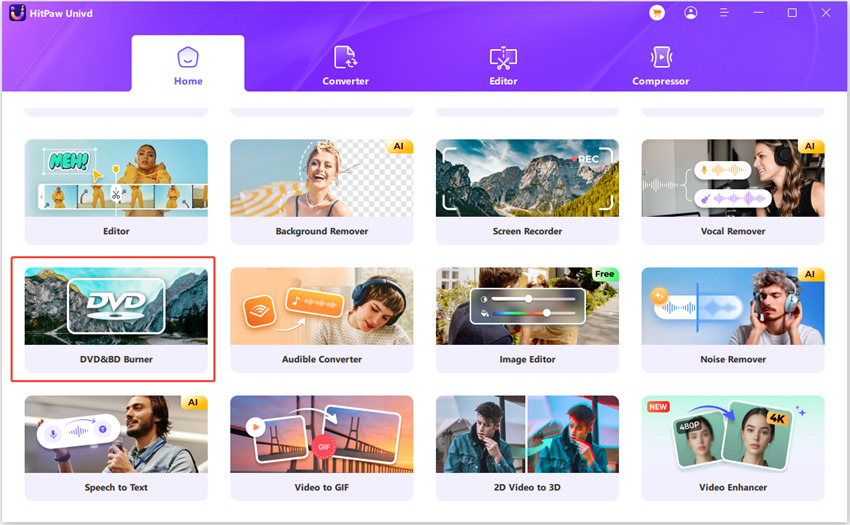
Step 1.Download and install HitPaw Video Converter on your computer. Choose the DVD Burner feature from the Toolbox.

- Step 2. Insert a blank disc into your computer's disc drive.
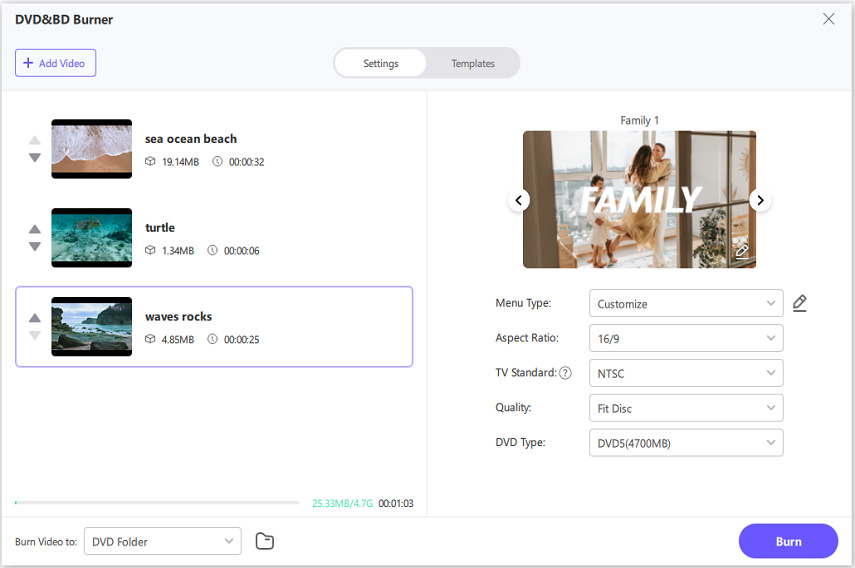
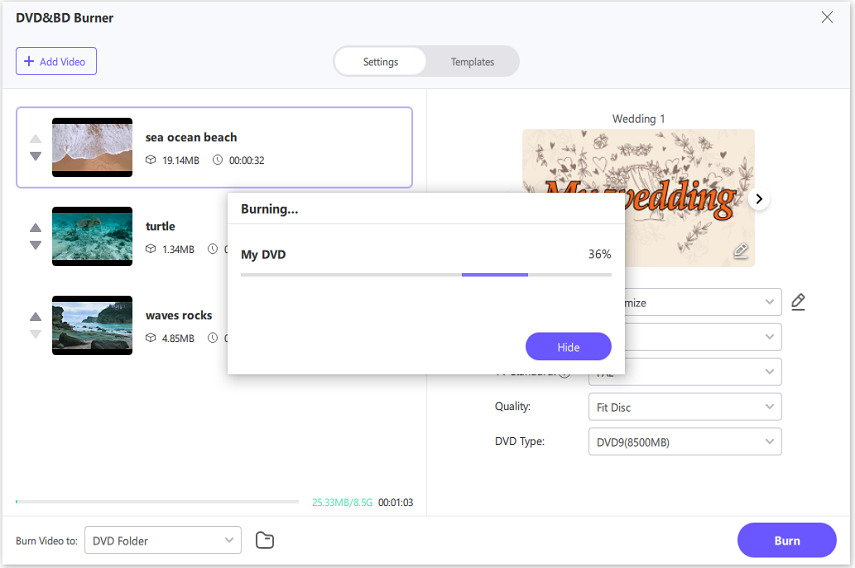
Step 3. Click “Add Video” to add the movie to the program. You can see the estimated occupied size and the total size of the DVD disc you’ve inserted.

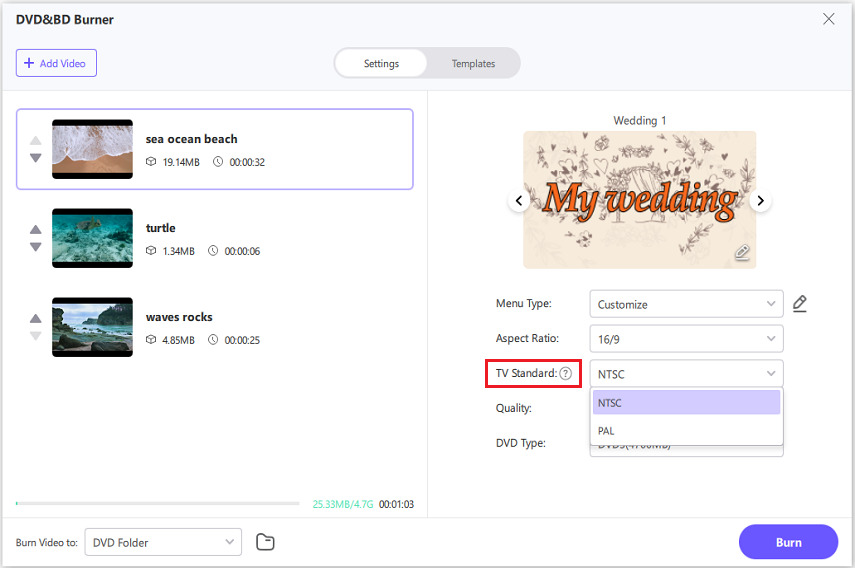
Step 4.After adding the movie, you can set up the output parameters including aspect ratio, TV standard, quality and DVD type.

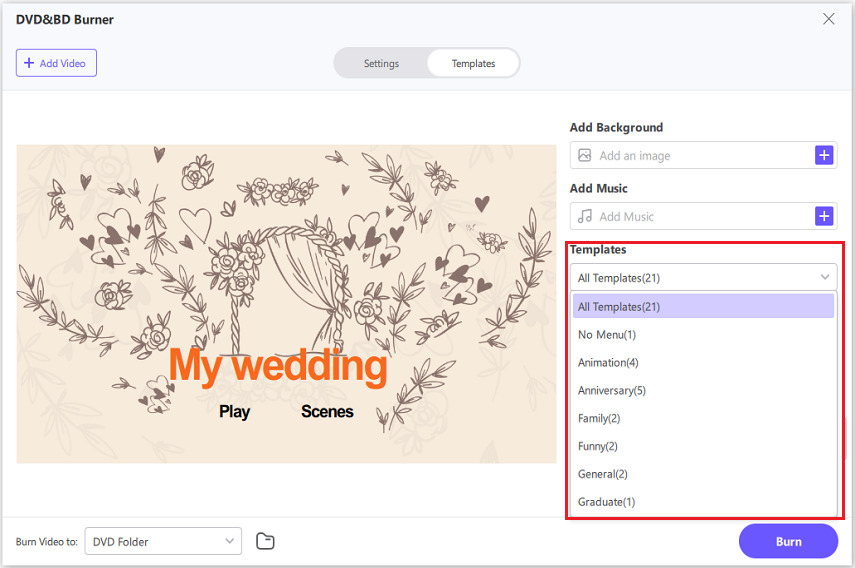
Step 5.Switch to the Templates menu, you can select a template for your disc.

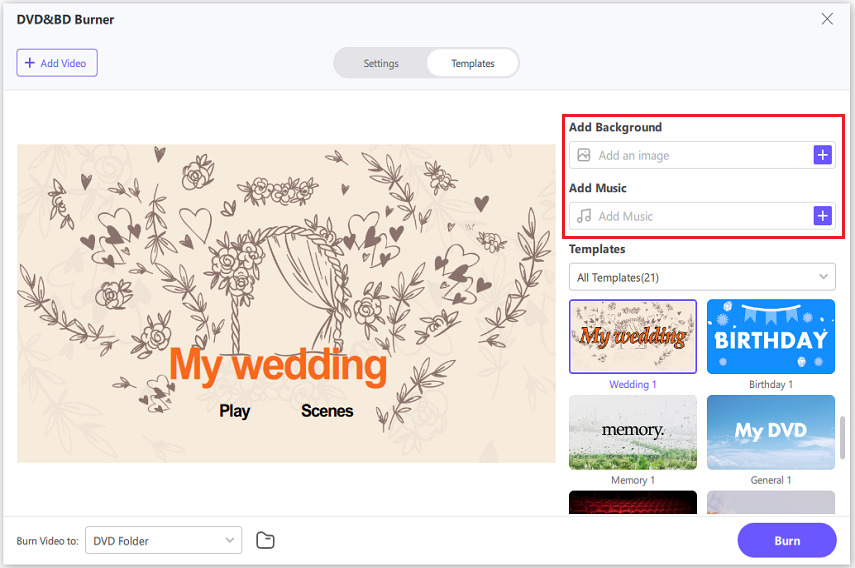
Or, you can add your own image as the background picture, add the background music from computer, and customize the DVD menu.

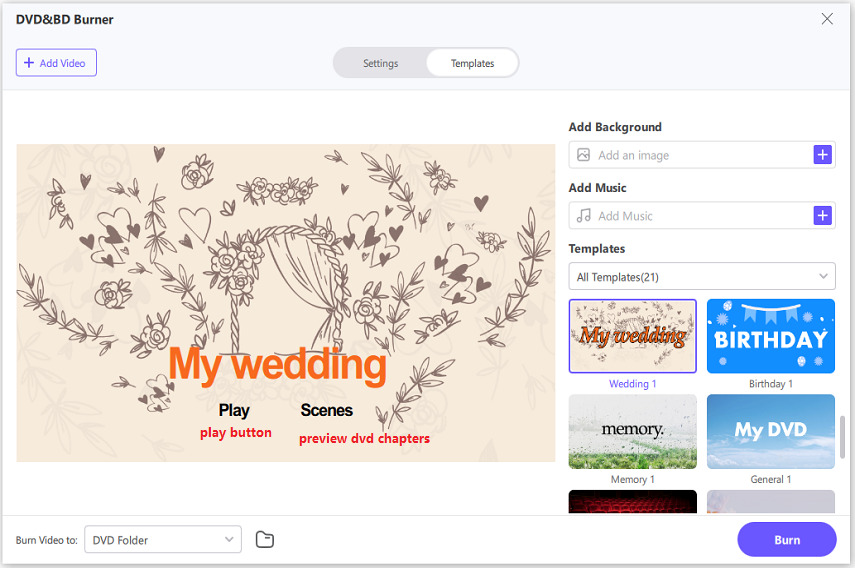
Step 6.Before burning the movie, you can preview the DVD menu and chapters.

Step 7.All is ready, you can just click the Burn button to start burning movies to DVD disc. The burning speed depends on the disc size.

And that's it! You've just burned a movie to DVD with HitPaw Video Converter. Here is a straightforward video guide:
Part 3. How to Burn a Movie to DVD using Windows Media Player
When it comes to burning movies to DVD on Windows, you can also use the free Windows Media Player. It's one of the most popular media players on Windows, and it's capable of burning movies to DVD.
Burning a movie to a DVD using Windows Media Player is a straightforward process. It allows you to create a playable DVD that can be watched on DVD players and computers with DVD drives.
However, it's important to note that Windows Media Player has limited functionality for DVD burning compared to dedicated DVD authoring software.
How to Burn a Movie to DVD using Windows Media player?
Here's a guide to help you through the process:
Step 1: Prepare your movie file
- Ensure that your movie file is in a compatible format for DVD burning. Windows Media Player supports common formats like AVI, WMV, and MPEG.
- If your movie is not in the correct format, you might need to convert it using a separate video conversion software.
Step 2: Launch Windows Media Player
Open Windows Media Player on your computer. You can usually find it by searching for "Windows Media Player" in the Start menu.
Step 3: Create a new burn list
- Click on the "Burn" tab located at the top right of the Windows Media Player window.
- If the burn list pane is not visible, click on the "View" menu and select "Playlist and video pane" to show it.
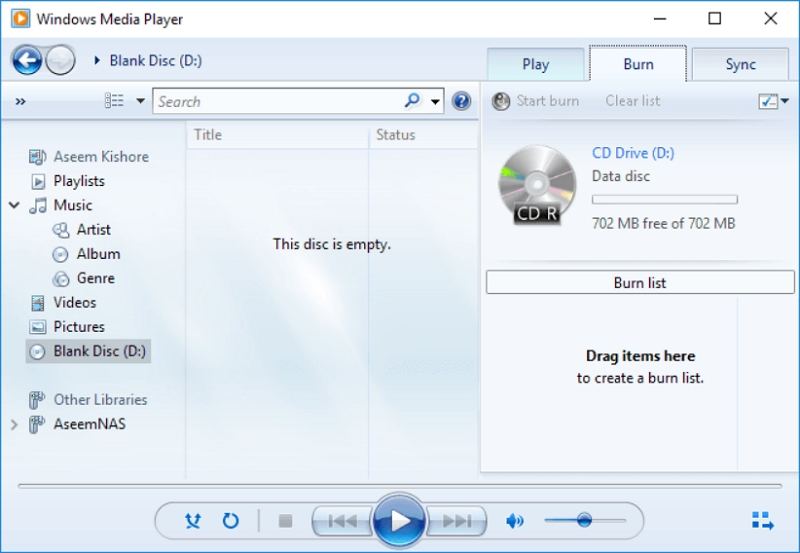
Step 4: Add your movie to the burn list
- Locate your movie file in Windows Media Player's library or browse your computer to find the file.
- Drag and drop the movie file into the burn list pane.
Step 5: Arrange the playback order (optional)
If you want to change the order of the videos, click and drag the movie files within the burn list pane to arrange them as desired.
Step 6: Start the DVD-burning process
- Insert a blank DVD-R or DVD+R disc into your computer's DVD burner drive.
- Make sure the disc is recognized by your computer.
- Click the "Start burn" button located at the top right of the burn list pane.
Step 7: Wait for the burning process to complete
- Windows Media Player will start encoding and burning the movie to the DVD.
- The time it takes to complete the process will depend on the length and size of the movie file.
Step 8: Finalize the DVD (optional)
- After the burning process is complete, you can choose to finalize the DVD. Finalizing makes the DVD compatible with most DVD players.
- To finalize the DVD, eject it from your computer and re-insert it. Windows Media Player will prompt you to finalize the disc.
Pros:
- It's free and comes with Windows, so you don't need to install any extra software.
- You can burn multiple movies to the same DVD.
- You can customize the playback order of movies (optional).
Cons:
- Limited editing features compared to dedicated DVD authoring software.
- You might need to convert the movie file to a compatible format.
- Slow burn speed.
Part 3. How to Burn a Movie to DVD with DVDStyler
DVDStyler is another great DVD-burning software that you can use to burn movies to DVD. It's open source and free, making it an ideal choice for users on a budget.
How to Use DVDStyler to Burn DVD from a Movie
Step 1: Download and Install DVDStyler
Visit the official DVDStyler website (www.dvdstyler.org) and download the appropriate version for your operating system.
Step 2: Launch DVDStyler
Once installed, open DVDStyler by double-clicking the desktop shortcut or locating it in your program files.
Step 3: Create a new DVD project
- After launching DVDStyler, click on "File" and select "New" to create a new DVD project.
- Set the project properties like video format, aspect ratio, and audio format according to your preferences.
Step 4: Add your movie file
- Click on the "Import" button or drag and drop your movie file into the DVDStyler project window.
- Ensure that your movie file is in a compatible format (e.g., AVI, WMV, MPEG).
Step 5: Customize the DVD menu (optional)
- If desired, you can create a custom DVD menu by selecting a template from the available options or designing your own.
- Customize the menu layout, background, buttons, and text according to your preferences.
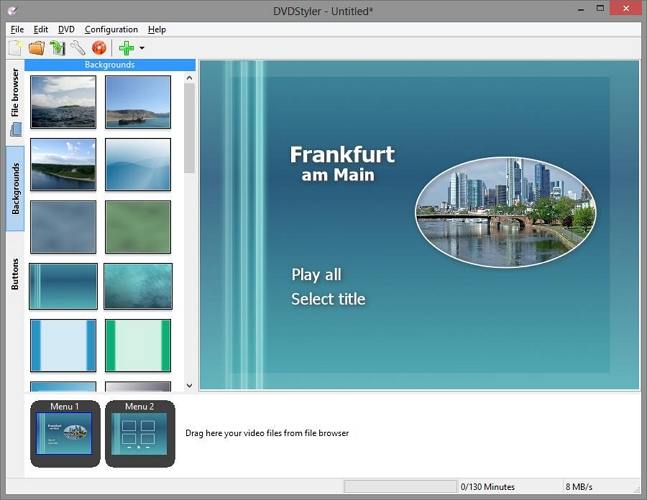
Step 6: Add chapter markers (optional)
- To add chapter markers to your movie, navigate to the point where you want to insert a chapter and click on the "Add Chapter" button.
- Repeat this process for each chapter you want to include.
Step 7: Preview the DVD
- Use the preview feature in DVDStyler to check how the DVD menu, chapters, and overall navigation will appear when played.
- Make any necessary adjustments to the menu or chapters if needed.
Step 8: Burn the movie to DVD
- Insert a blank DVD-R or DVD+R disc into your computer's DVD burner drive.
- Click on the "Burn" button in DVDStyler to initiate the DVD-burning process.
- Choose the appropriate burning settings, such as burn speed and disc label.
- Start the burning process and wait for it to complete.
Step 9: Eject and test the DVD
- Once the burning process finishes, eject the DVD from your computer.
- Insert the DVD into a DVD player or computer with a DVD drive to test and ensure that the movie plays correctly.
Part 4. FAQs about Burning Movies to DVD
1. How long should it take to burn a DVD?
The time it takes to burn a DVD will depend on the length and size of the movie file as well as your computer's speed and the burn speed you choose. Generally speaking, it can take anywhere from 10 to 30 minutes.
2. Can a DVD hold 3 hours?
Yes, a DVD can hold up to 3 hours of video. However, the quality of the video will be decreased if the movie is longer than 2 hours. It is recommended to use a dual-layer DVD if you are trying to fit more than 2 hours of video on one disc.
The Bottom Line
No matter why you want to burn a movie to DVD, the above-mentioned methods will help you create a professional-looking DVD in no time.
However, if you want the easiest and quickest solution, we recommend using HitPaw Video Converter. It's a powerful video conversion software that allows you to convert any movie file to a compatible format and then burn it to DVD. Plus, it's easy to use with an intuitive user interface, so even inexperienced users can use it with ease.
So, if you want to burn a movie to DVD without any hassle, download HitPaw Video Converter now.





Home > Burn DVD > Top 3 Ways to Burn Movies to DVD on Windows/Mac
Select the product rating:
Joshua Hill
Editor-in-Chief
I have been working as a freelancer for more than five years. It always impresses me when I find new things and the latest knowledge. I think life is boundless but I know no bounds.
View all ArticlesLeave a Comment
Create your review for HitPaw articles