How to Edit Video with HitPaw Edimakor (Video Editor)
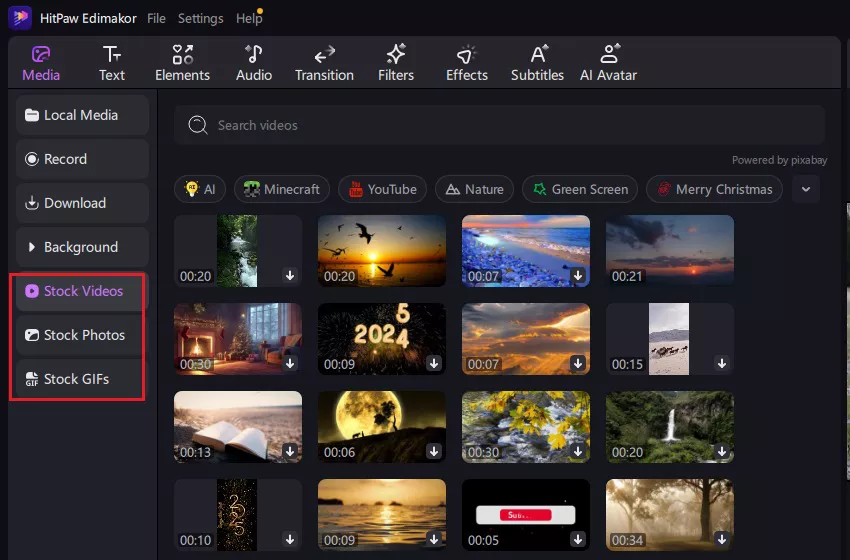
HitPaw Edimakor (Video Editor) allows you to upload videos, audio files, images, GIFs. Besides, HitPaw also provides Stock Media for you to importing trendy videos, images, stickers and GIFs to your video. By simply searching with keywords, you can precisely find the right materials you like.
Its Stock Media Library is powered by:
- GIPHY
- Unsplash
- Pixabay
1. Editing Videos
Want to edit your videos? Follow the below detailed guide.
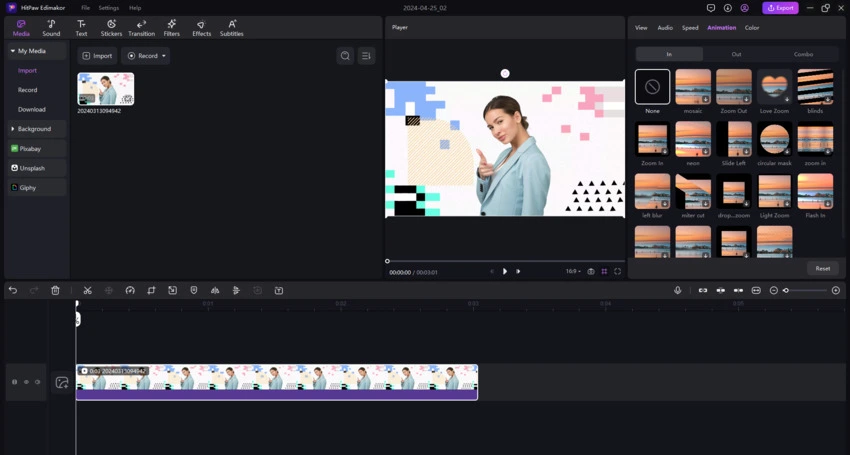
Add Video to the Track
Click to select the video, right-click to choose “Add to New Track” or just drag the video to the main track at the timeline.
Delete the Video
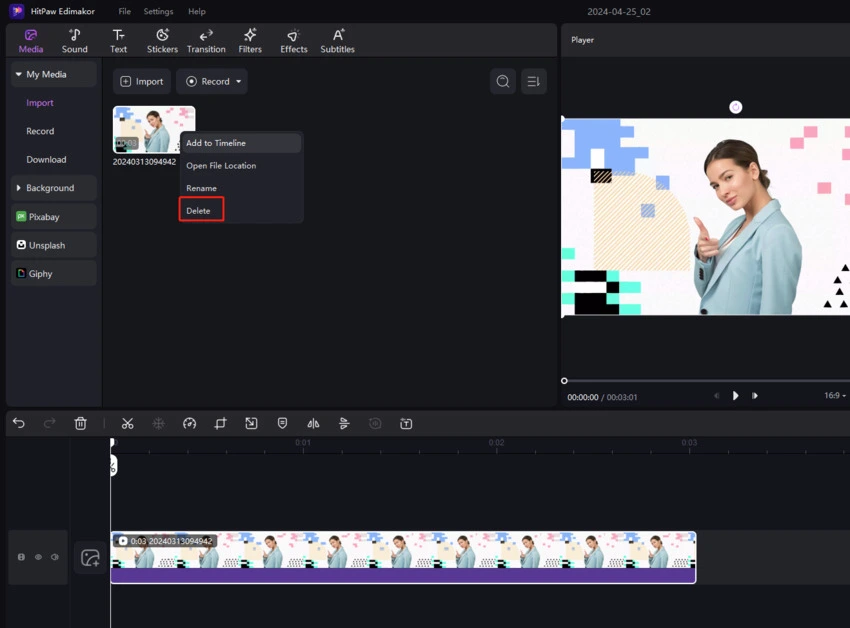
Add the video you do not want? Click on the added video, right-click to choose “Delete” or click on the “Delete” button at the quick toolbar to delete it.
Preview the Video
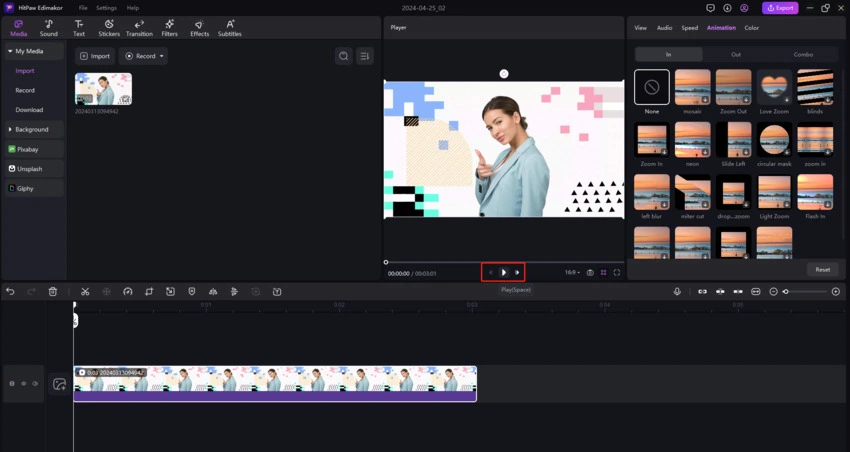
Click on the “Play” button on the preview windows to see the video content you are editing. Or you can enable the “Preview Line” to view or target the place you want to find.
Split the Video
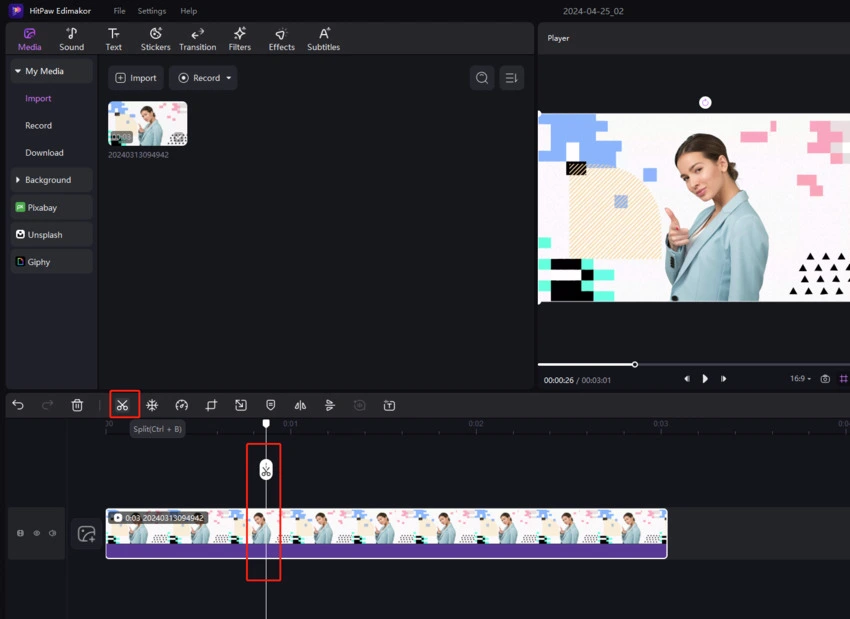
Delete one part in the video is easy to achieve via splitting. Just go to drag the playhead to the start point of the unwanted part, then, click on the “Split” icon at the quick toolbar. Now head to find its end point, click on “Split” again. Select the unwanted part, click on the “Delete” button to delete it.
Tips: If you only want to trim from the beginning or the end of the video, you can click on the video at the timeline, drag the start edge or the end of the video clip forward or backward to remove the unwanted part.
Change Video Speed
HitPaw Edimakor (Video Editor) provides both uniform speed and speed ramping features, whose speed controller can help you slow down or speed up the video as required with several steps.
1. Uniform Speed
To adjust video at a uniform speed, you only need to click the video on the timeline to select it. Click “Speed” icon at the quick toolbar. In the pop up window, you can drag the slider or set the video duration to change the speed.
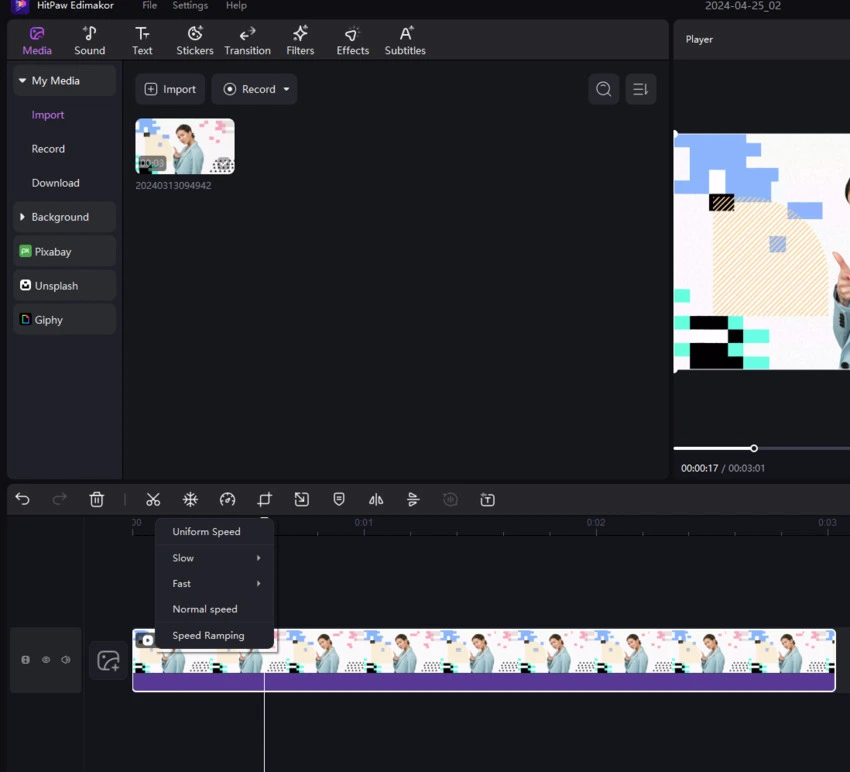
2. Speed Ramping
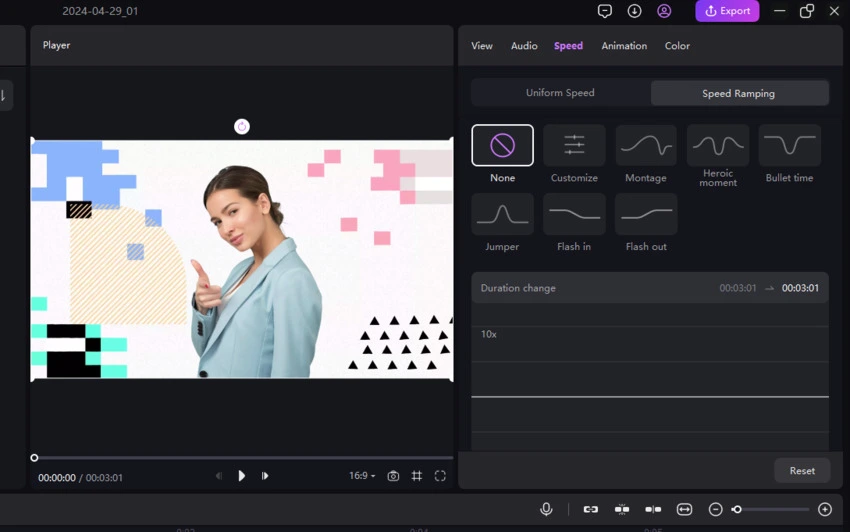
In term of making a speed ramp on video, you can click on the “Speed” icon again, and then customize the speed on the right side of the preview box. It also provides several free templates for speed ramping.
Tips:
- When you customize the speed, you can add as many time nodes as you want.
- You can make custom changes to the speed on the templates.
Crop the Video
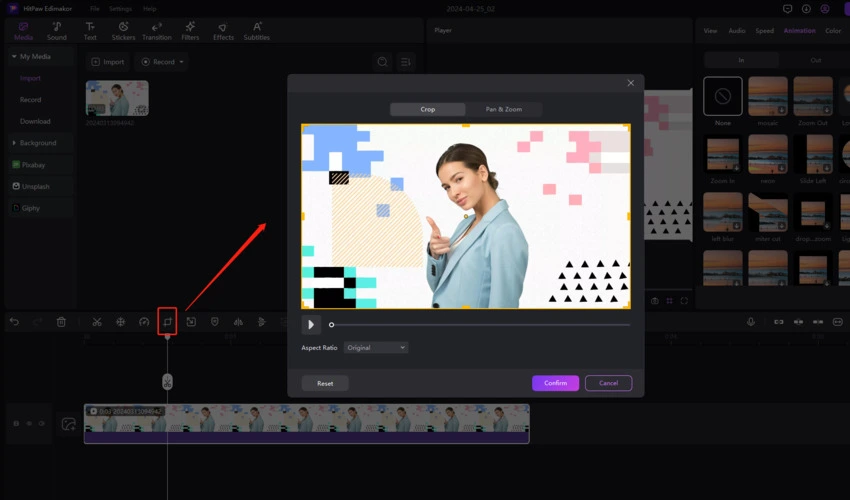
The video contains some area you do not need? Click on the “Crop” icon at the quick toolbar after choosing the video at the timeline. Drag the selection to keep the part you need or you can change the Aspect Ratio to set the selection size, then, move it to select the part you need. Play to check if you are satisfied with the result. Click “OK” to crop the video.
Freeze Frame
Freeze frame is used to stop the action and frame in the video. It also means that the motion video is converted to stillness for a certain period of time due to freeze frame. If you want to make a movie or some creative videos, freeze frame is a great feature to use.
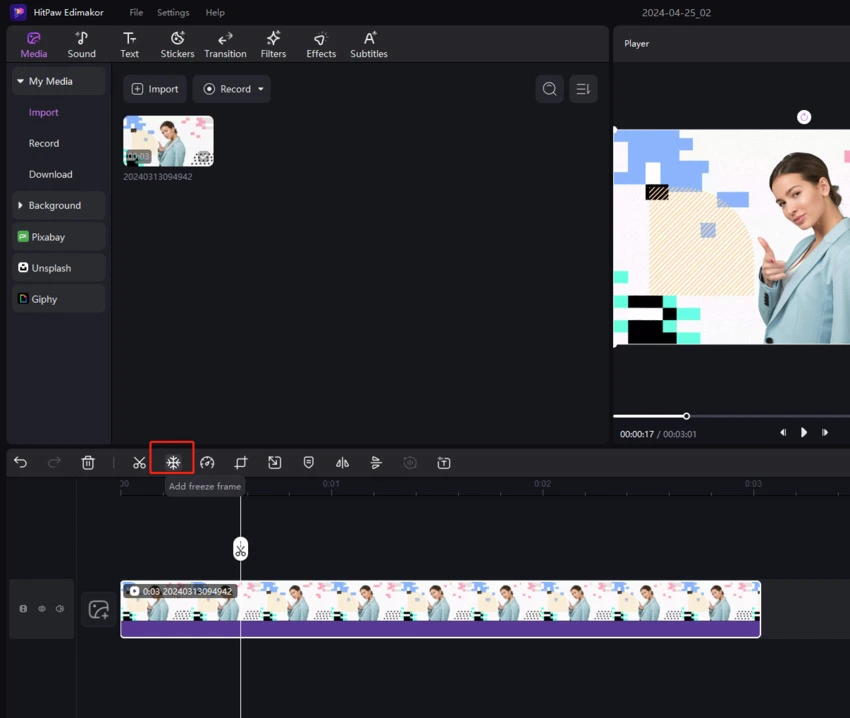
Just click on the “Snowflake” icon on the quick toolbar, then the freeze frame is made. Or you can right-click on the clip in timeline to choose “Add freeze frame”.
Pan & Zoom the Video
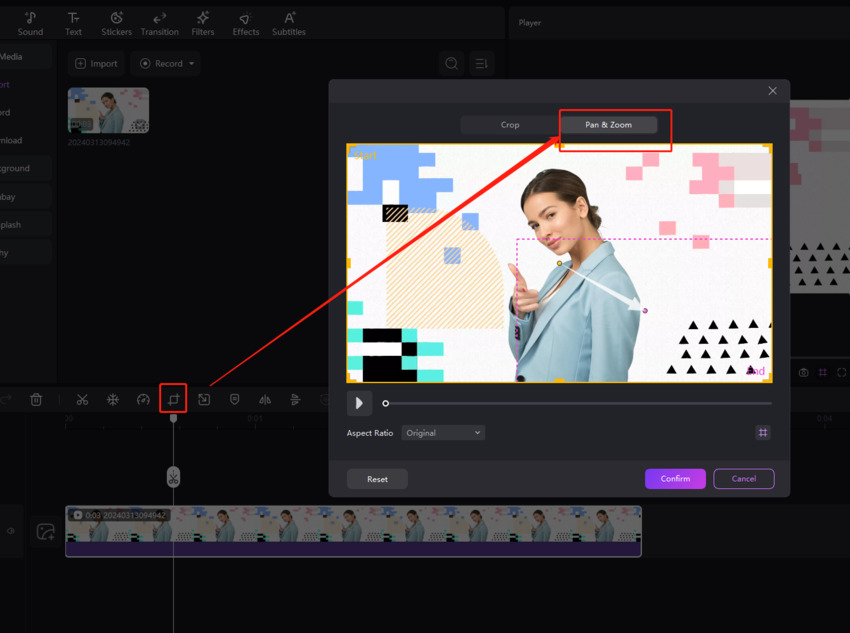
Pan & Zoom feature can easily to make professional-looking camera movement and produce stable film. Find Pan & Zoom feature in “Crop” icon at the quick bar upper the timeline as well. Select "Pan & Zoom" option at the top of the pop-up window, and then select the start and end positions. And then you can preview the effect by clicking the play icon below. If you’re satisfied, Click “OK” button.
Rotate the Video
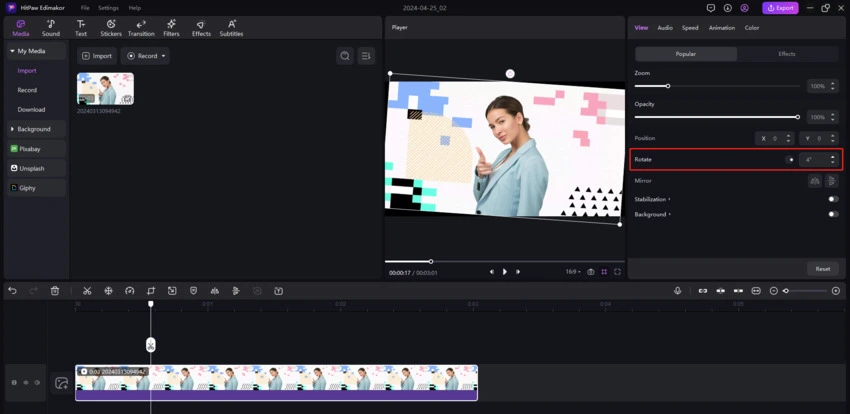
Rotate the video directly via entering the angle you prefer. You can also move your mouse on the circle rotate icon to click on the angle you want it to rotate or just move your cursor to the big yellow circle of the line on the preview window, then, drag to the angle you want to rotate.
Mirror the Video
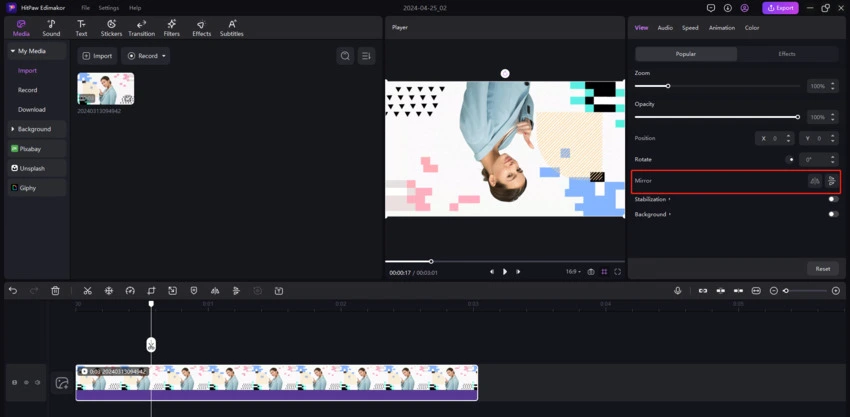
When your video at the timeline is selected, you can find the mirror options: flip horizontal or flip vertical at the right-top properties part. Click on the flip horizontal of flip vertical to mirror your video.
Zoom the Video
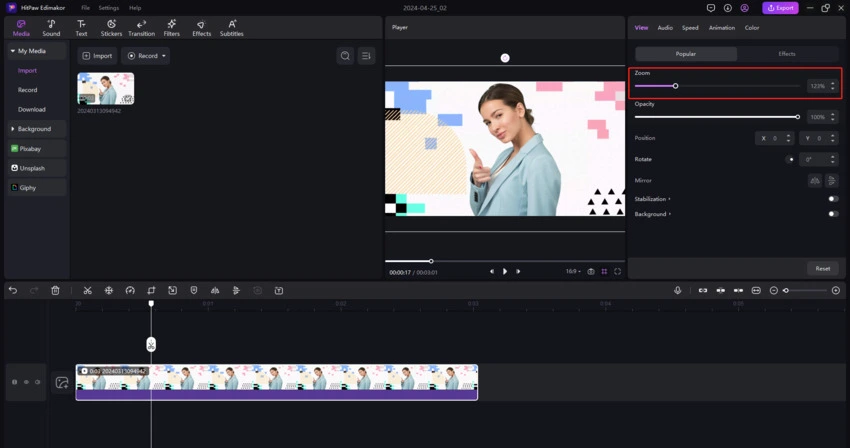
If you do not want the video occupy the whole canva or want to play only one part, you can zoom in or zoom out the video via dragging the slider under “Zoom”.
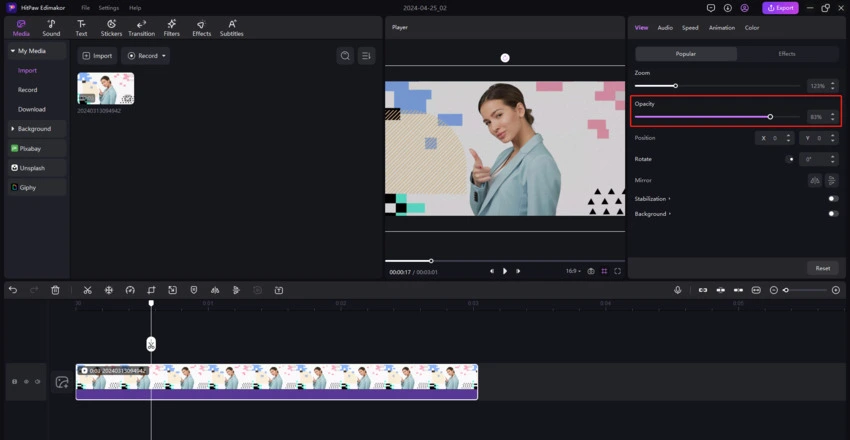
Change the Video Opacity
The video is 100% opacity by default. But if you want to adjust the opacity and show the media or the background behind the video, just go to drag the slider to change the opacity to achieve it.
Video Stabilization
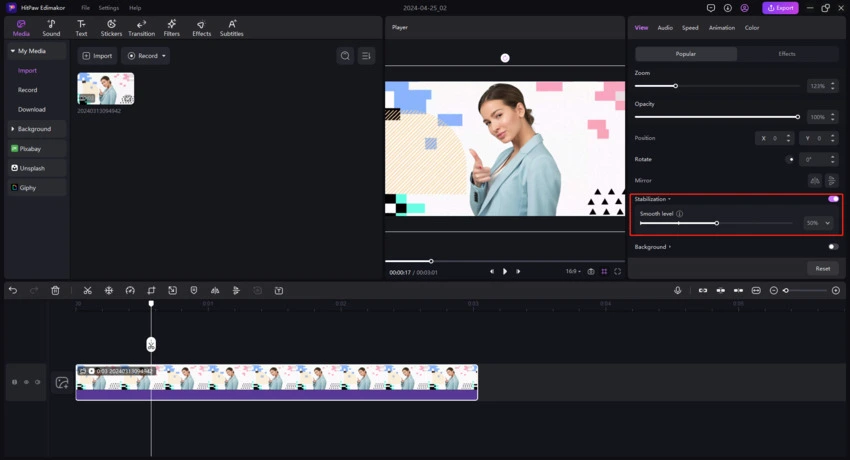
In handheld or action footage, the picture will inevitably jitter, but in post-production we can keep it stabler with the help of video stabilization feature, which can eliminate unwanted camera movement in your video clips. To make a more obvious and effective video stabilization effect, you need to use HitPaw Edimakor (Video Editor), with a built-in video stabilizer tool, to make your video smoother and more professional with one-click.
Steps:
- Upload your video, and find Stablization in Properties Windows, and then enable it.
- The default is 50% smooth level, but you can also increase it to 75% or 100%.
Tips: Higher smooth level makes the pictures stabler, but causing larger pictures cropping range.
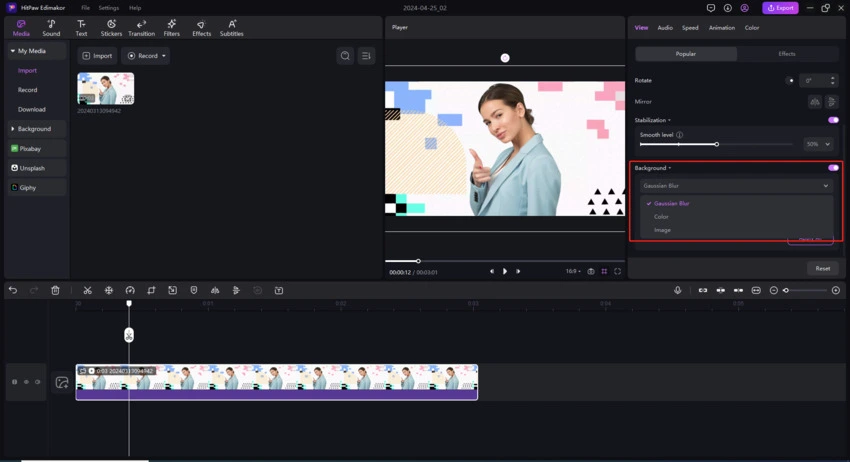
Change the Video Background
Sometimes, your video cannot be 100% cover the background. For this case, you may want to have one beautiful background. HitPaw Edimakor (Video Editor) can help you change the background without effort. Just make sure the video at the timeline is selected. Navigate to the view window, scroll down and you will find the background option. Select “Guassian Blur” “Color” or “Image” to change the background to the color or image as you request.
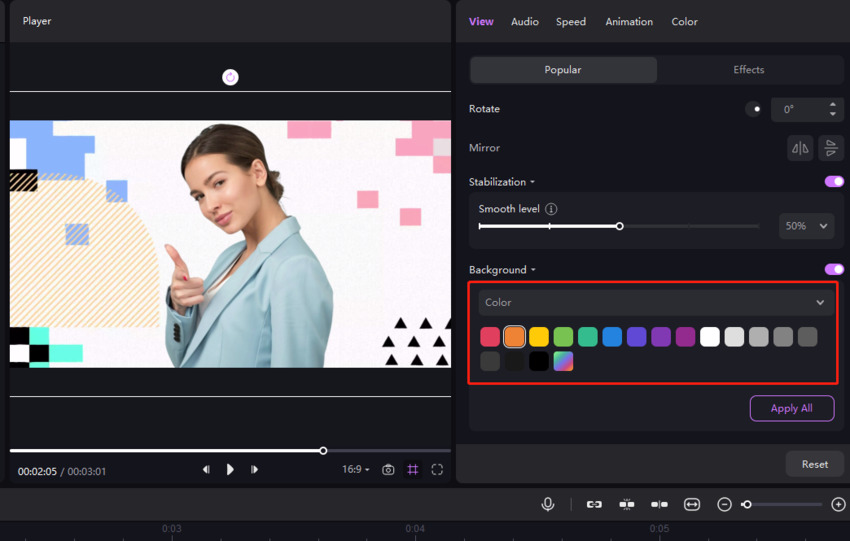
We also provide a color picker function to help you quickly choose the proper background by clicking and dragging your cursor. Drop down to select “Color” in the Background option. Click on the colorful box to customize the color of the background, then you can find the color picker on the right side of Basic Color, click on it, and then move the mouse to the color you want on the screen. The color you choose will also leave a history on this program for the next time you use it again.
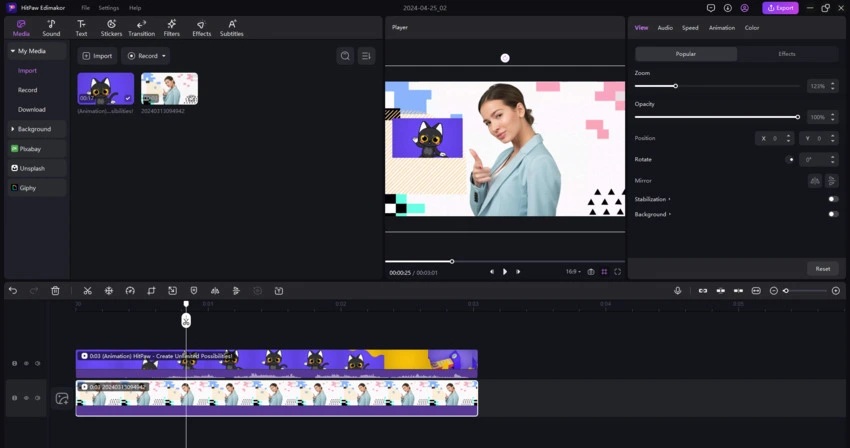
Create Picture in Picture
To create a picture in picture video, you can add one video at the main track, then, drag another one video that you want to set as the smaller video to one new track, go to the preview window, drag the corner of the video to adjust the size and move it to the place you want to put it. Now, you can play to check whether it is what you need.
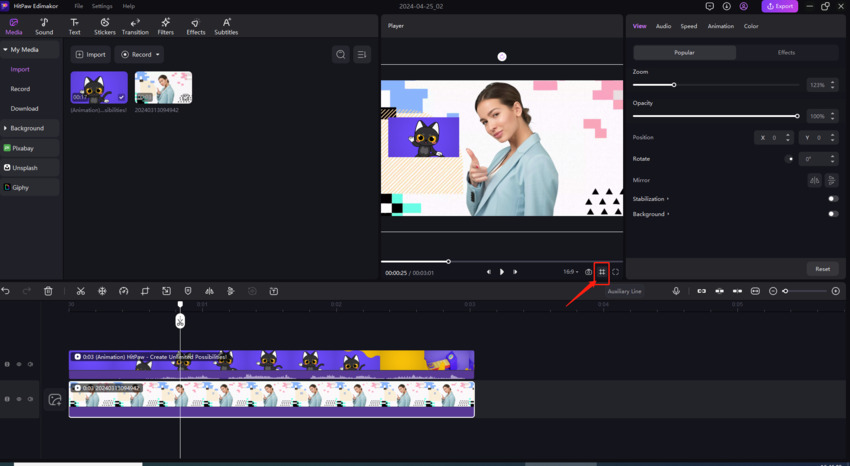
In order to move your video to the position you want, we provide the function of auxiliary lines. Whenever you move your video to the middle or the border of the video, it will trigger the auxiliary line to remind you. If you don’t need the auxiliary lines anymore, you can also close the auxiliary line feature by clicking on the icon to the left of the full screen icon in the preview box.
2. Editing Audios
HitPaw Edimakor (Video Editor) can also make professional edits on your audio. Here is the guide below.
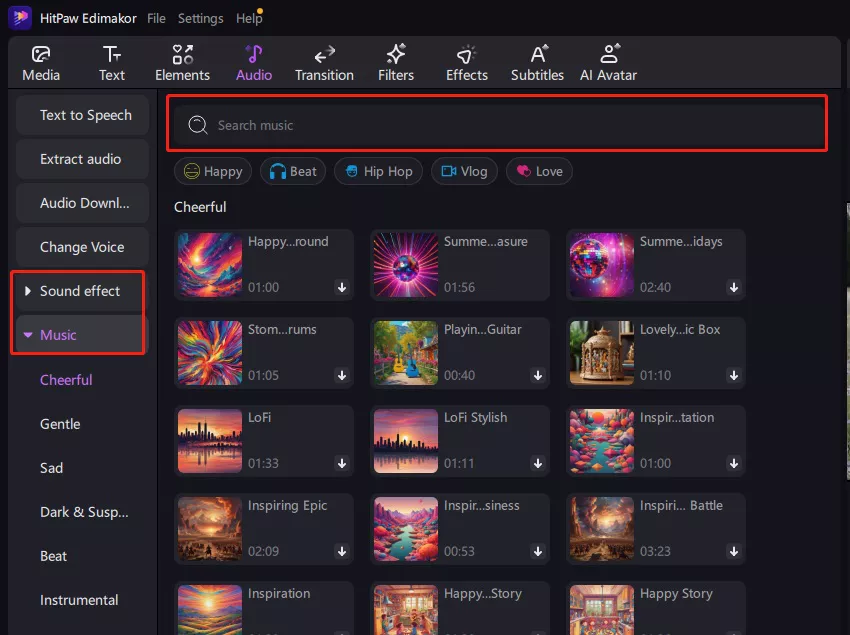
Add Background Music & Sound Effects
Background music and sound effects can bring much fun to your videos. You only need to add the video to the main track firstly, drag the audio from the media panel or your computer to the timeline panel, and then you can play to check whether it is what you need.
Delete Audio
If you find your audio was added by accident, you can click on the audio track, right-click to select the “Delete” or click on the “Delete” icon at the quick toolbar to delete this audio.
Mute Audio
If you do not need the original video sounds, you can directly click on the audio icon on the left side of the timeline panel.
Detach Audio
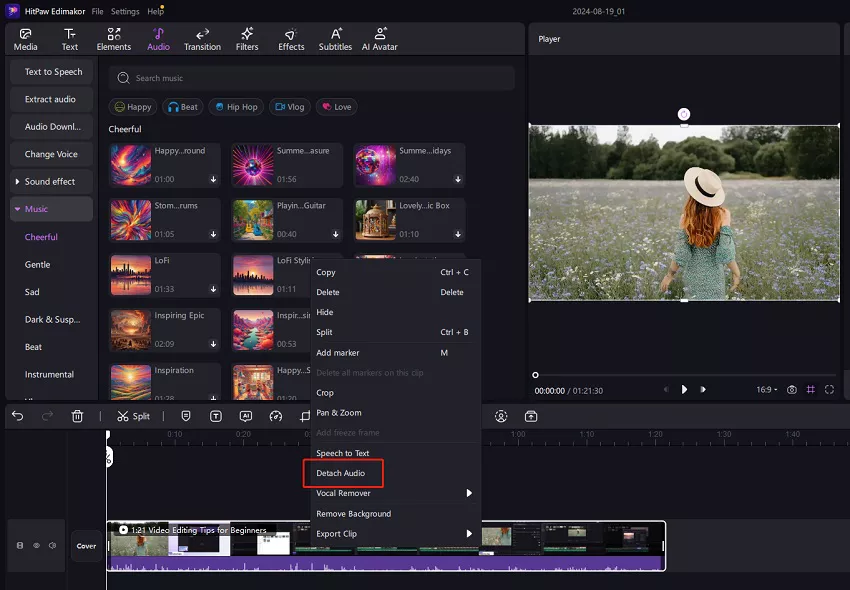
Right click to choose the video and you will find the option of "Detach Audio". Click on it and a new audio track will appear automatically.
Split Audio
Click to choose the audio you want to cut. You can split it directly or click on the split icon at the quick tool bar.
Change Audio Speed
Select the audio at the timeline, click on the speed icon and then you will find some options for changing the audio speed. You can also adjust the speed parameters at the property panel.
Change Audio Volume
You can make your audio louder or quieter by dragging the slider at the property panel.
Fade in Or Fade Out
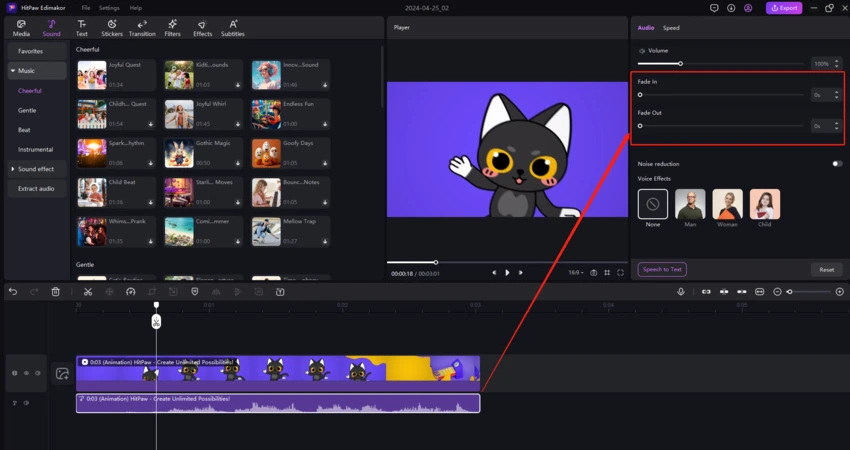
By dragging the slider at the property panel, you can make the audio gradually appear or fade away in the video.
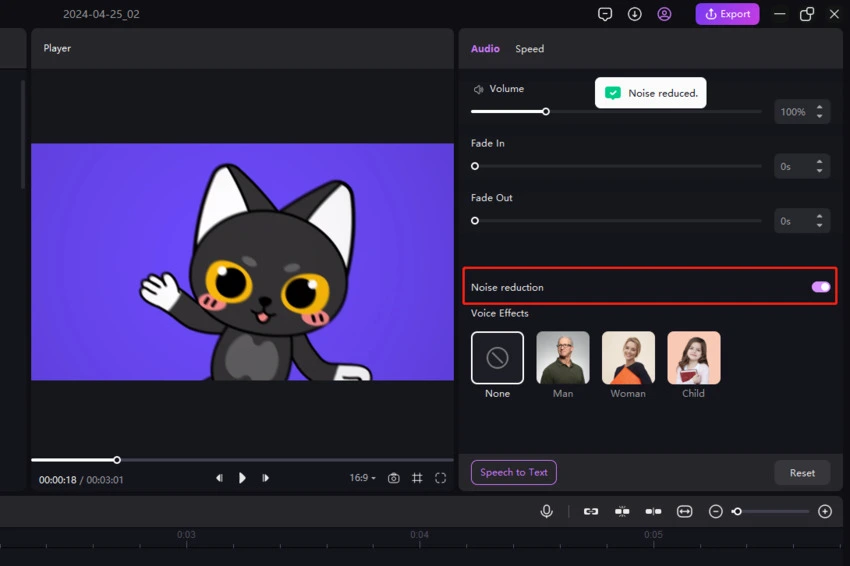
Noise Reduction
To reduce noise in your video, you can click on "Audio" on the video-editing panel and then enable "Noise Reduction".
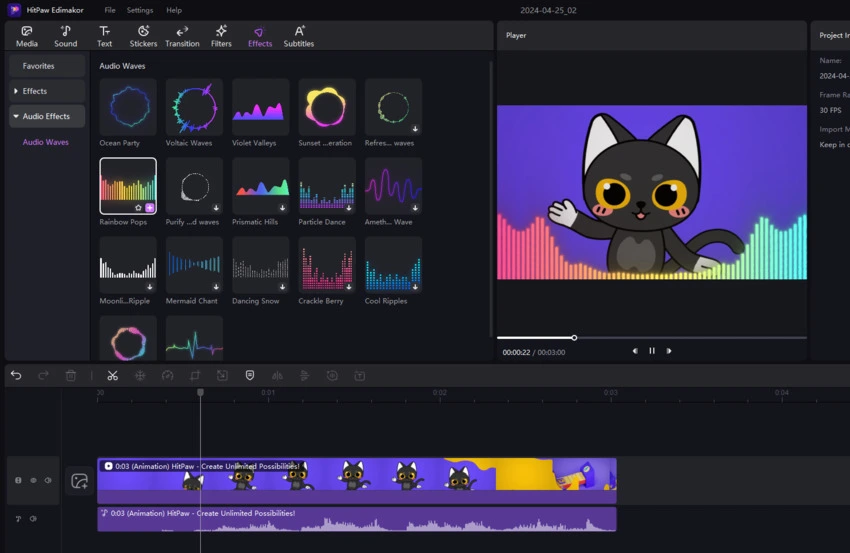
Auido Visualizer
Click on "Effects" and you will find the audio visualizer feature. With this feature, you can add more visual elements to your video, making it more attractive.
3. Editing Images
Images and GIFs are supported to upload to this program, so editing your images and GIF is possible here.
Add Image to Track
Go to the media library, click on the image, right-click to select “Add to New Track” or drag the image to add it to the timeline.
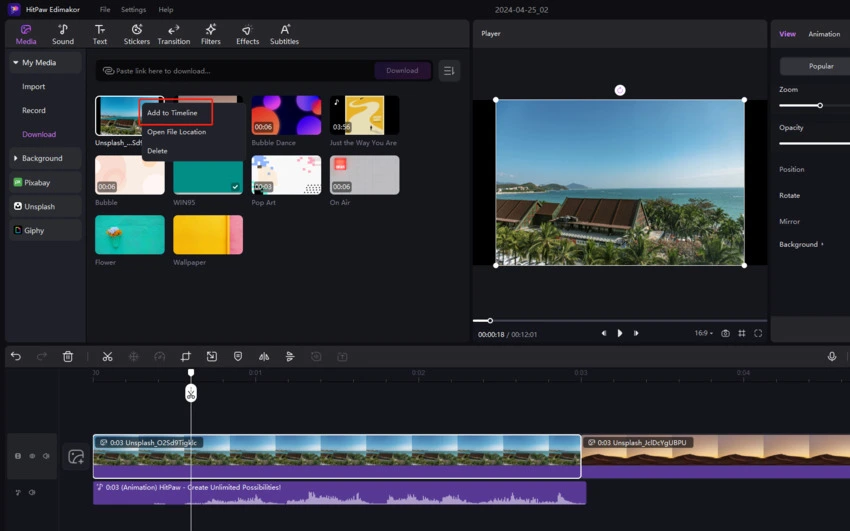
Delete Image
Select the image at the timeline, click on the “Delete” icon or right click to select “Delete” button to delete the image.
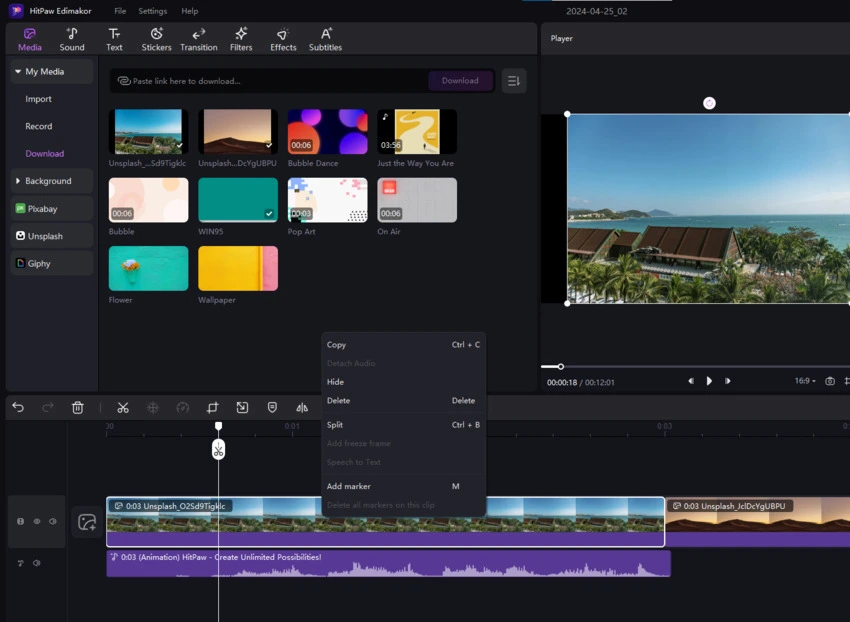
Zoom the Image
You can easily find the zoom setting after you select the image. Just drag it to adjust the image or you can drag the corner of the image in the preview window to zoom in or out.
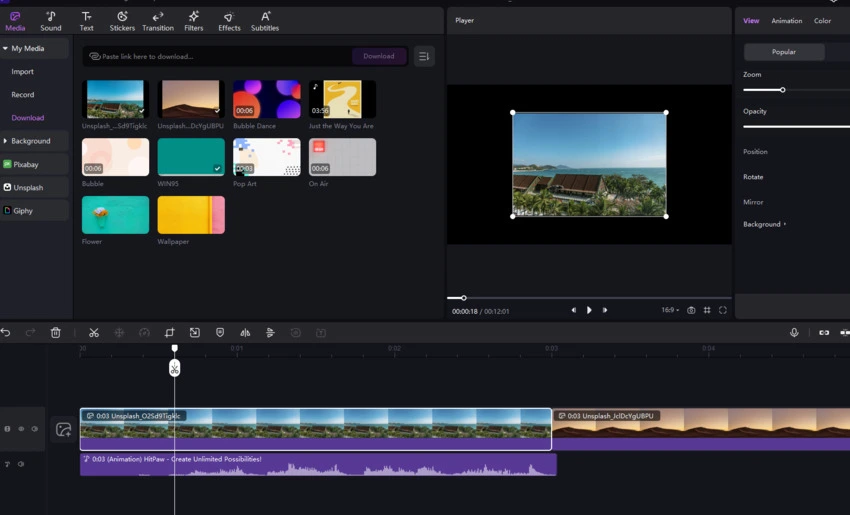
Change the Opacity of the Image
In some cases, you need to change the opacity of the image, just drag the slider under “Opacity” at the right top window to change the opacity after select the image at the timeline.
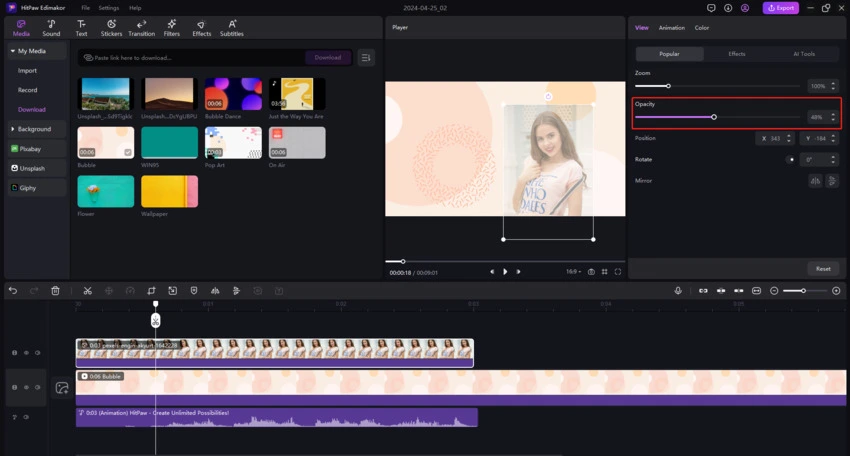
Rotate the Image
There are three ways to rotate the image: Before choosing one method, you need to click to select the image in order to find all options.
Way 1. Click in the circle dot under “Rotate” to change the direction of the image.
Way 2. Enter the accurate number of how you want to rotate it.
Way 3. Find the yellow dot at the preview window, move your cursor to the bigger yellow dot, long press to drag it and change the direction.
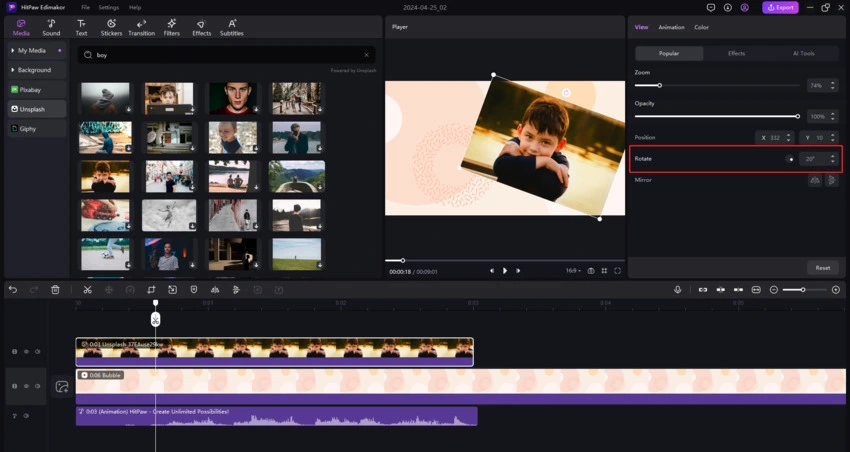
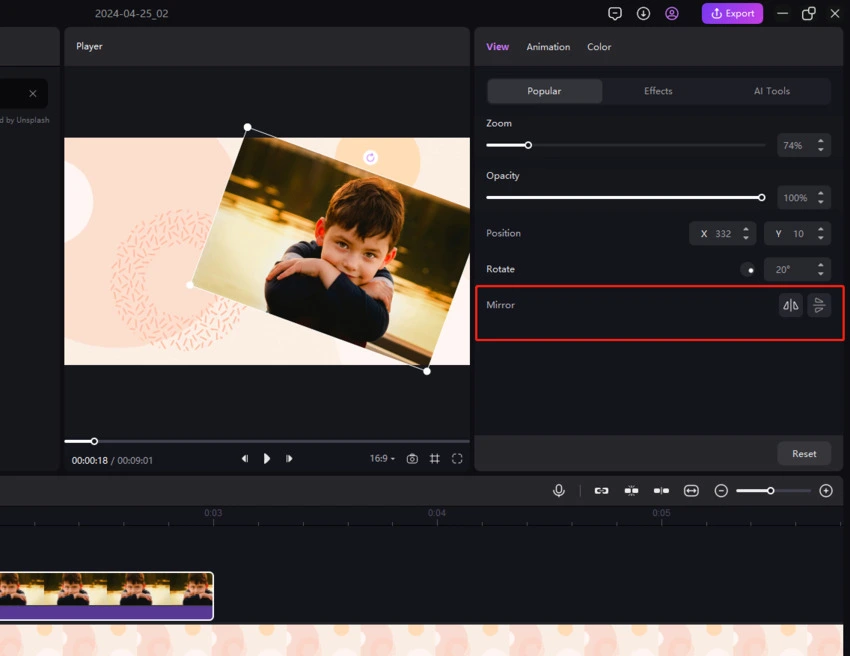
Mirror the Image
Mirror function is also at the right-top window, you can click on the flip horizontal or flip vertical to mirror it successfully.
Change the Image Position
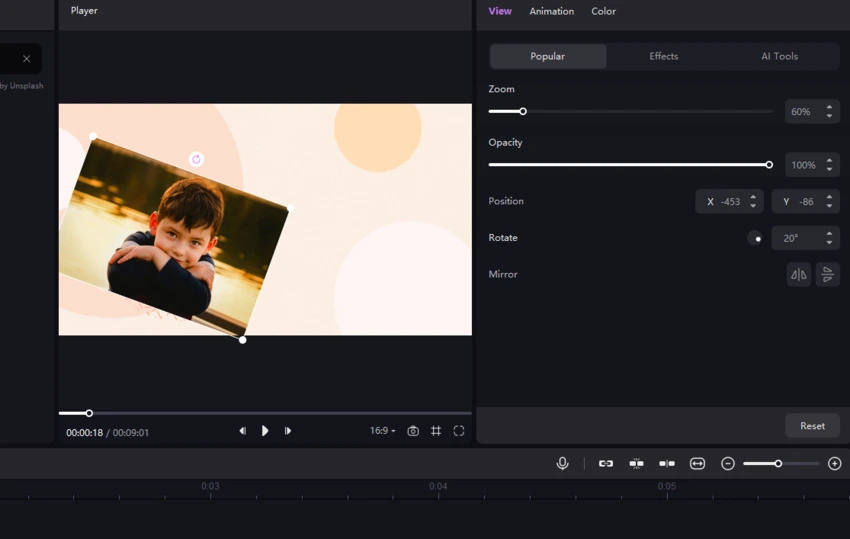
As all image editing functions, you need to keep the image in the selected status, then, move your cursor to the preview window and long-press on the image to move it to the place you want.
Change the Image Duration
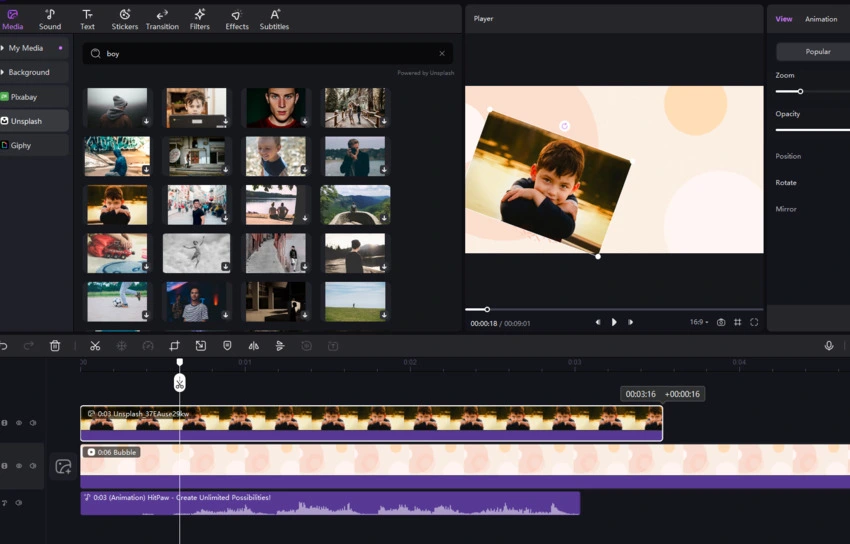
When you add the image to the timeline, it will have the default duration. But what if you want to have this image appear longer or shorter? The only thing you need to do is to change its duration. You can drag the edge of the image to the length you need. This is super easy.
Adjust the Image
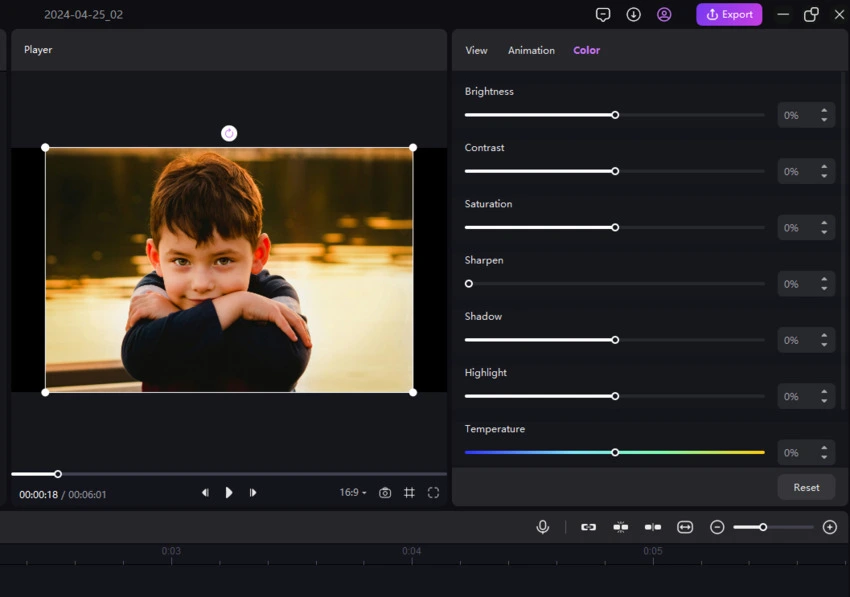
You can find the brightness, contrast, saturation, sharpen, highlight, shadow, temperature, tone options after clicking “Adjust”, just drag the slider to adjust your image.
4. Adding Texts
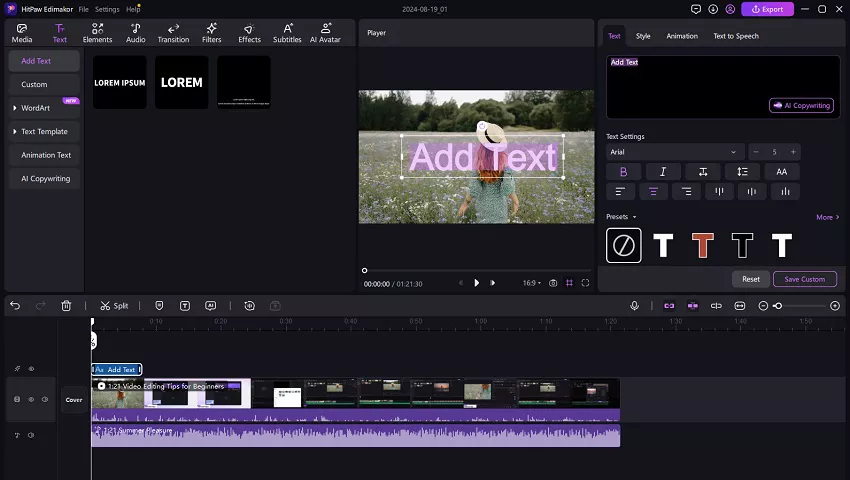
HitPaw Edimakor (Video Editor) allows you to input texts in the video and edit texts. Here are some easy steps.
Add & Edit Text
Step 1: Click on "Text" at the media panel and then drag "Default Text" to the video at the timeline panel.
Step 2: You can change the text duration by drag its edge. You can move or drag the corner of the text at the preview window to change its size and position.
Step 3: You can find different parameters for editing the text at the property panel. You can input your own words, change fonts and sizes, change text color and opacity, and even rotate the text, etc. There are also some preset text styles for you to choose.
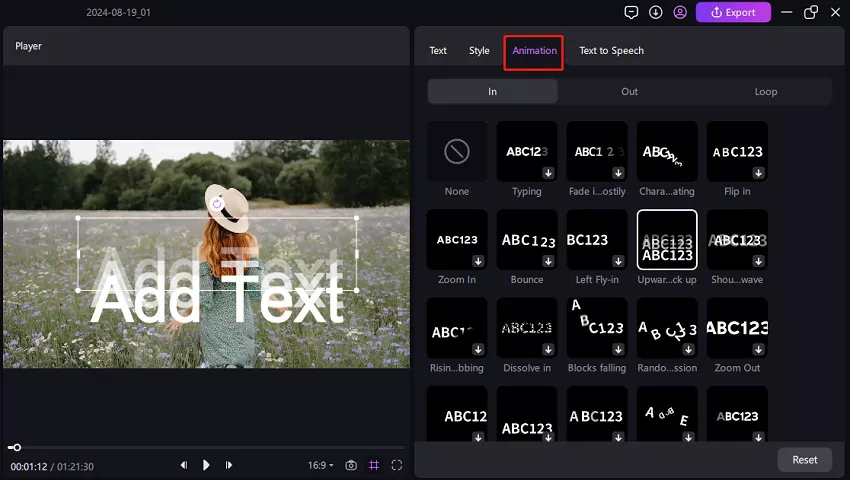
Add Text Animation
At the property panel, you can also find many animation effects for the added text.
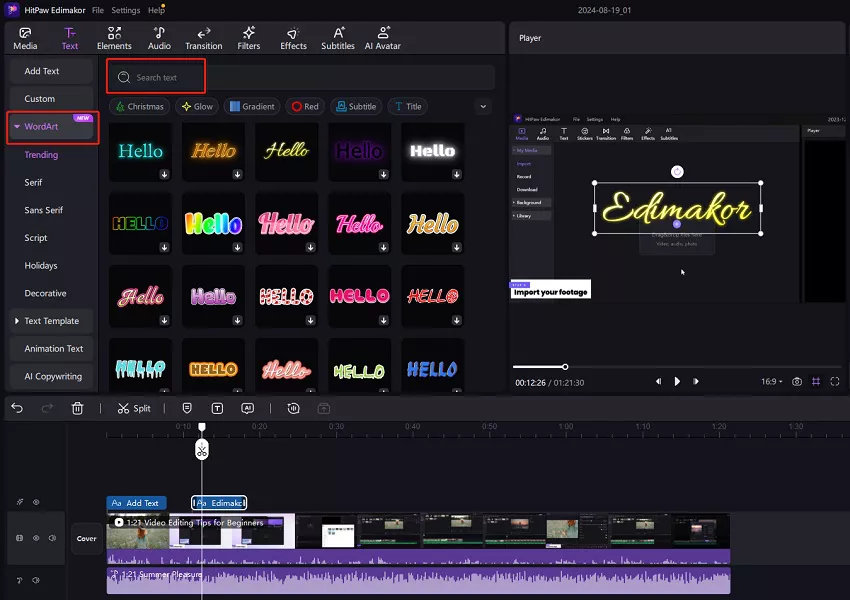
Use Wordart
At the media panel, you can find the basic text styles and wordart. Click the one you like and drag it to the video, and then you can edit the text and add animation at the property panel.
If you add the wrong text, you can click on it and then click the delete icon at the timeline panel, or you can just right click on it and then choose "Delete".
5. Adding Stickers
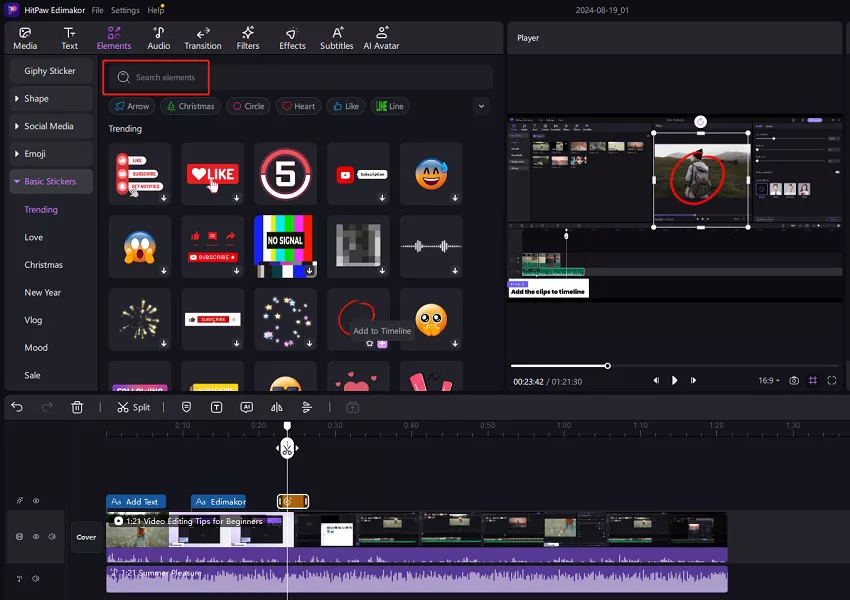
Stickers have the magic to make your video much more funny. HitPaw Edimakor (Video Editor) provides hundreds of interesting and popular stickers to make your videos more eye-catching.
Add Sticker
Find the stickers in the "Stikers" column at the left top corner of the interface. Drap the one you like to the timeline panel and add it to the video.
Edit Sticker
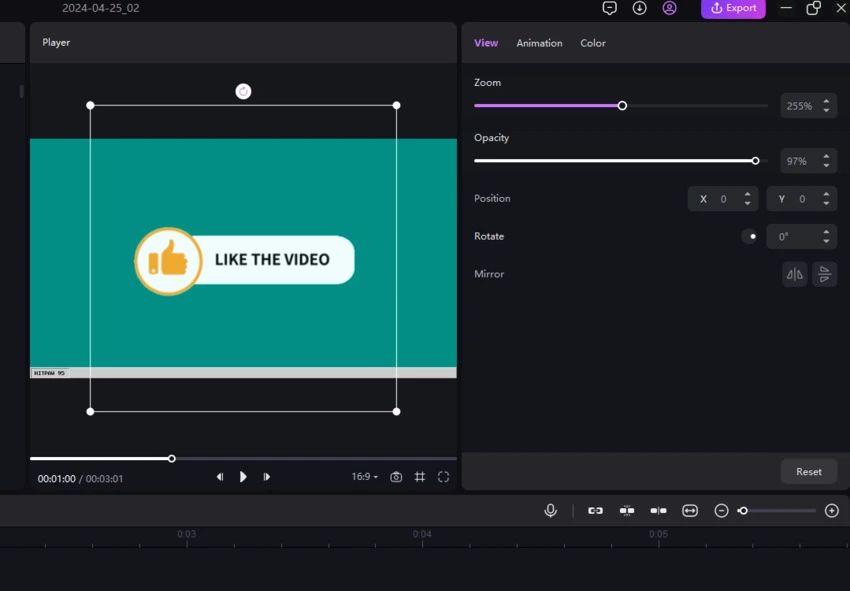
- Change the sticker duration by dragging its edge at the timeline.
- Adjust its size by dragging the corner at the preview window or dragging the slider under the “Zoom” option.
- Change its position with your mouse to move or rotate the yellow dot, or enter the exact X and Y position number at the preview window.
- Adjust the direction of the sticker by dragging the lever, clicking on the circle dot at the rotate function line, or input the actual direction number to rotate.
- Mirror the sticker by flipping horizontally or vertically.
- Change the sticker's opacity by dragging the slider below “Opacity”.
Delete Sticker
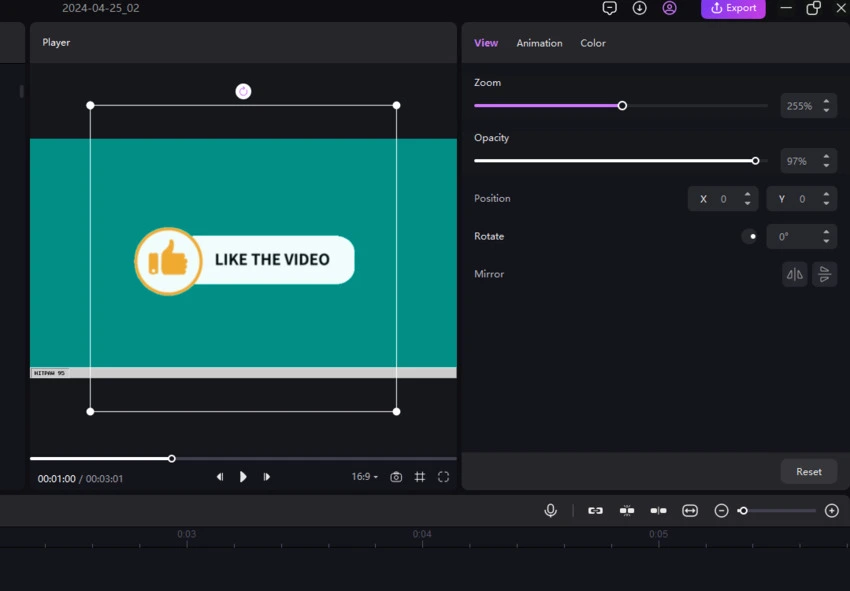
Select the sticker at the timeline and then click the "Delete" icon, or you can directly right click on the sticker and choose “Delete”.
Add Sticker Animation
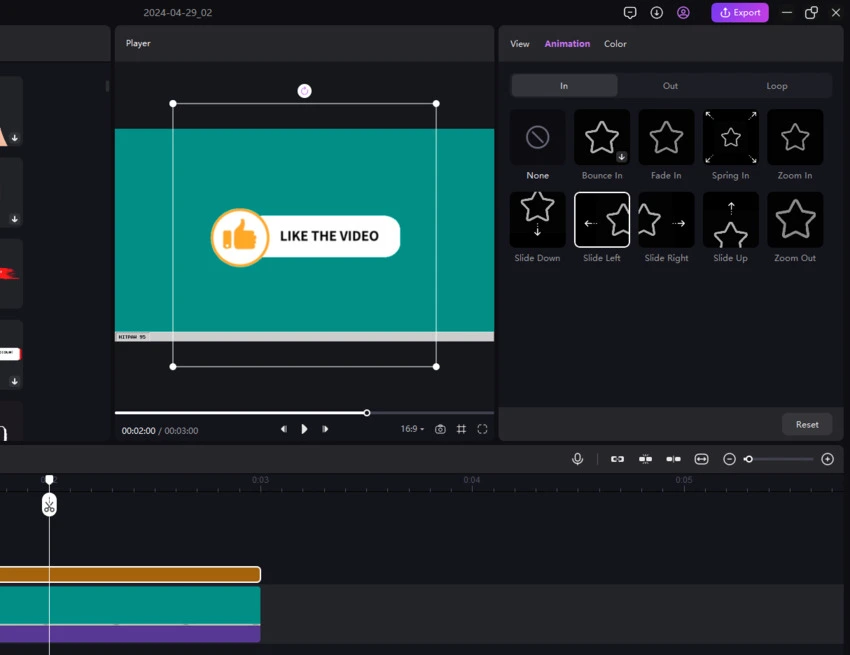
Click on the "Animation" column and choose "in, out, or loop" effect for the sticker.
Adjust Sticker Color
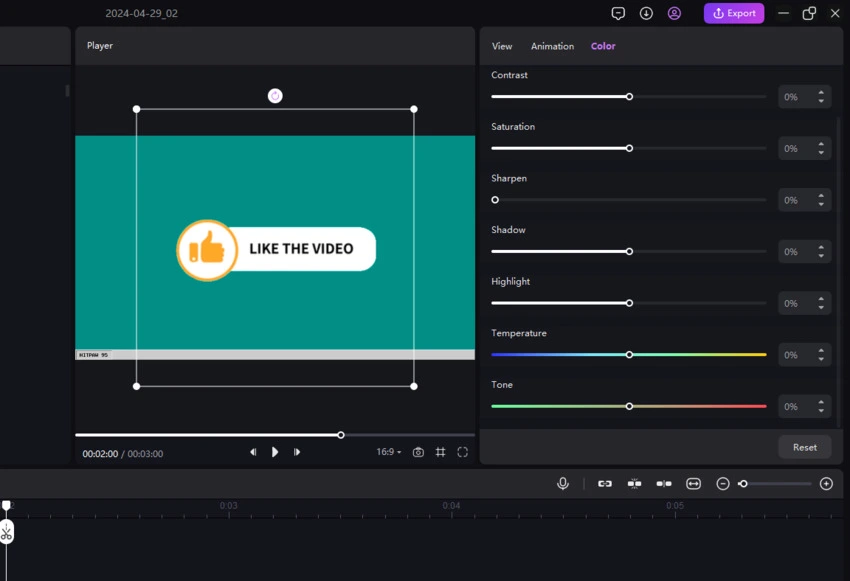
Click on the "Color" column and adjust the different parameters of the sticker, such as brightness, highlight, temperature and tone.
6. Adding Transitions
Transitions will be a great way to make the scene transition in your video more fluently. Just follow the below guide to learn how to add transitions to your videos.
Add Transitions
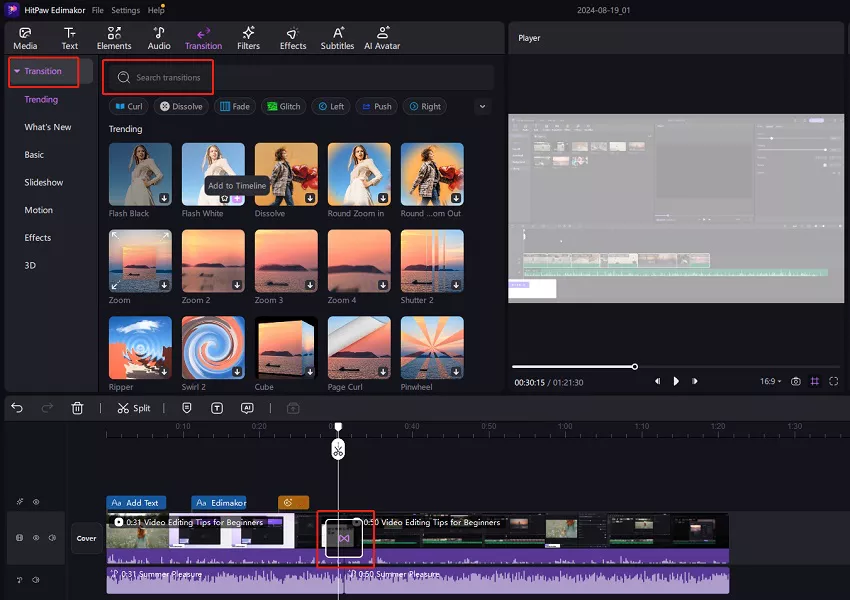
Navigate to “Transition”, find the transition effect, click to check whether it is what you need, drag the one you want to the place you want to have one transition. Now you can have transitions between you video clips. If you want to have transition in one video, you can split the video firtsly, then, add the transitions.
Edit Transitions
The transition will have the default length after you add it between your videos, images, gifs. You are also allowed to change it via dragging its edge or input the duration you need at the right top window.
Delete Transitions
If these transitions you already added are not what you need, you can select it, click the “Delete” or tap “Delete on your keyboard ” to remove.
7. Adding Filters & Effects
To beautify your video and make it more interesting, you can use the abundant filters and effects HitPaw Edimakor (Video Editor) provides.
Add Filters & Effects
There are two ways to add filters and effects to your media files.
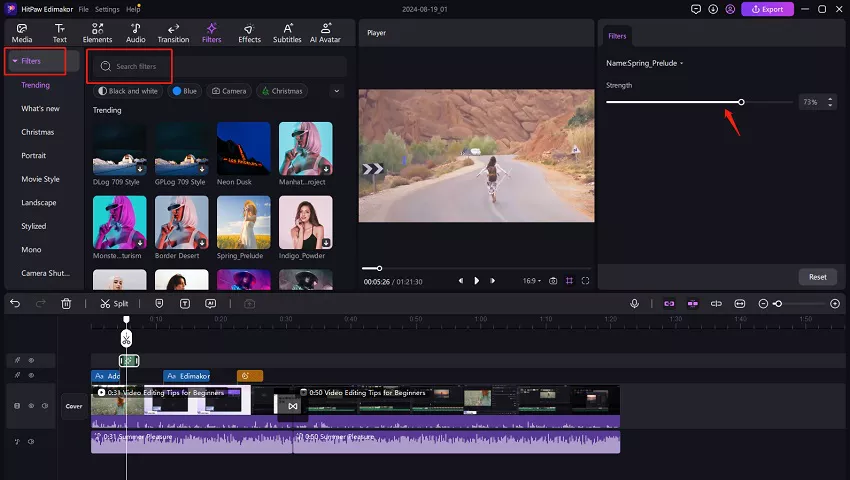
Method 1: Click the “Filters” or "Effects" resources, drag the one you need directly to the video on the main track and it will be automatically applied to the entire video clip.
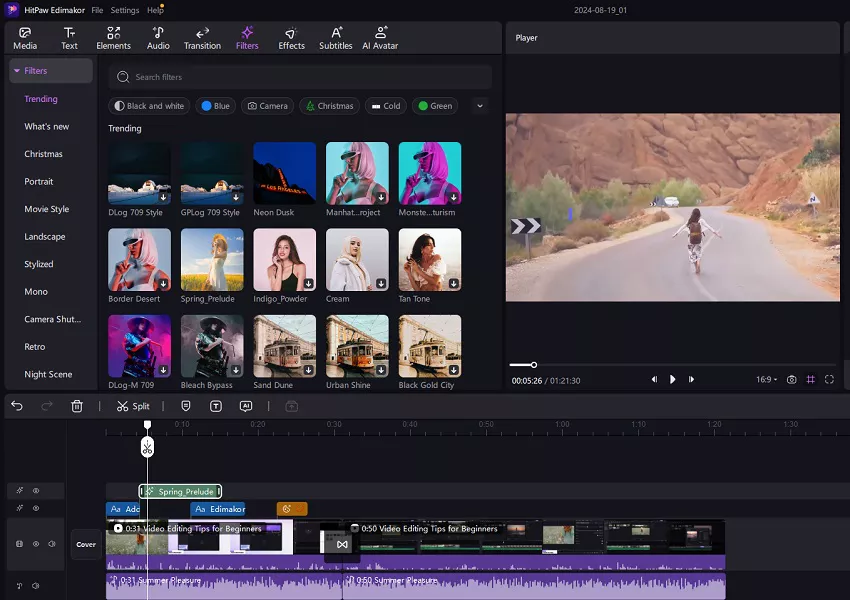
Method 2: Drag one filter or effect to close to the main video track and a new track for editing the filter or effect will show up.
Edit Filters & Effects
You can drag the edge of the filter or effect to change their duration. Click on the applied filter and you can change its strength. Click on the applied effect and you can change its parameter. Different effects have different parameters.
Delete Filters & Effects
There are two methods to delete the filters or effects.
Method 1: If you drag and directly apply the filter or effect to the whole video clip, you can click on the clip and find the "Effect" option in the "View‘ column at the top right property panel. Then you can click on the delete icon to delete the applied filter or effect.
Method 2: If there is a new track after you add a filter or effect, you can just right click on the new track and delete the filter or effect.
8. AI Editing
HitPaw Edimakor (Video Editor) also has many powerful AI editing features to help you create videos effortlessly. Let's have a look at them.
Speech to Text / Auto Subtitles
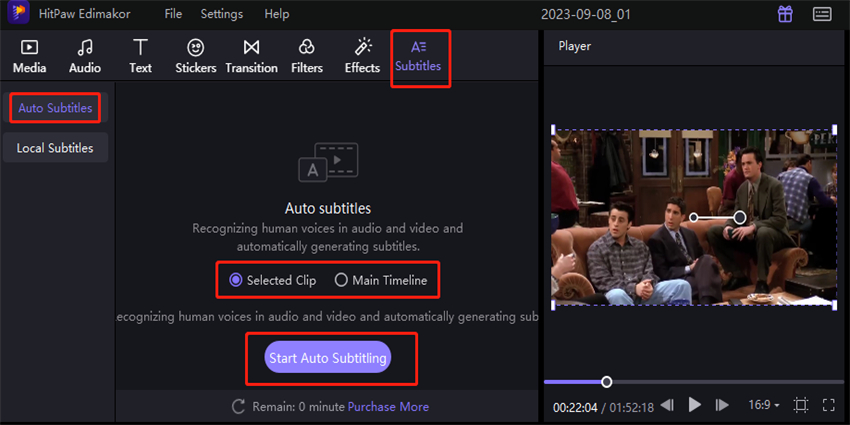
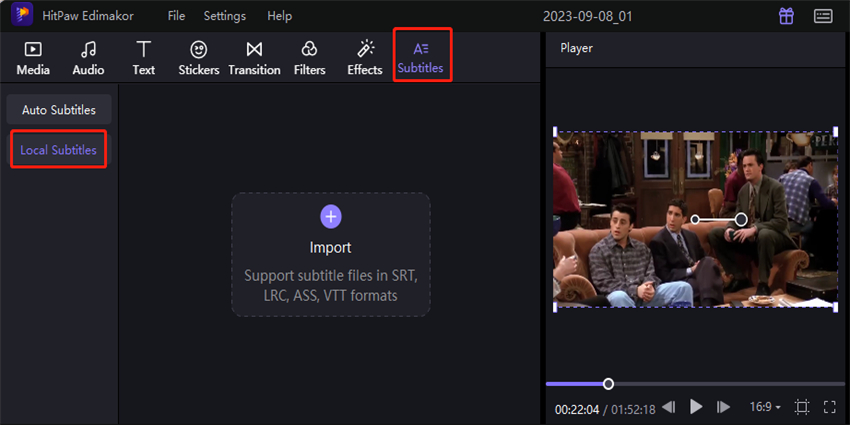
Click on "Subtitles" at the media panel and you will find two options of "Auto Subtitles" and "Local Subtitles". You can start auto subtitling for a selected clip or a video at the main timeline. You can also import your local subtitle files in SRT, LRC, ASS, and VTT formats.
